
Fedora KDE dual-boot guide
This guide shows you how to dual-boot Fedora KDE (or any other Fedora edition of your choice) with Windows 10/11. There are some extra resources linked at the end that can help you if you get stuck.
As of the time of writing, the latest version of Fedora is 44. We recommend that you download the latest version of Fedora that is available, instead of using the version this guide uses.
Please follow this guide from top to bottom step-by-step if you’re a beginner to Linux. Do not attempt to use an LLM to summarize this document. LLMs make mistakes.
If you want a video to follow, I recommend KSK Royal’s excellent Fedora Dual-boot guide available at the below link. Please come back and follow the After-install Steps once you’re done following this video guide.
https://www.youtube.com/watch?v=UZFI9Bx83Fs (You can skip the system restore step, and PLEASE give more than 100GiB of space (ideally half of your drive or more) to Fedora, you cannot change this later (easily, at least))
Table of Contents
1. Things you need
An internet connection
A 4 GiB (gigabyte) or larger pendrive to flash Fedora on to.
8GiB+ is recommended.
This pendrive will be WIPED, so please back up any data on it.
A back-up of your computer’s data in case anything goes wrong.
At least 100GiB of free space on your hard drive to install Fedora.
2. Downloading the installer ISO
To install Fedora KDE, you must download the “live” “ISO” file. An ISO file is a file that contains a bunch of files (i.e. an archive of files) which can be flashed onto a pendrive or CD.
A live system is an operating system that can directly be booted off of a pendrive or CD without installing it to the hard disk. This system is ephemeral in nature, meaning that it loses any file/disk changes you make when you reboot. It is a great way to test out an operating system and see if it is compatible with your machine’s hardware without installing it on your machine’s hard drive. Most Linux distros (including Fedora) provide a Live system ISO that you can use to boot into a flashed pen-drive and run the installer from within the live system.
This ISO can be downloaded from the Fedora Website. I recommend you try finding the download link to the latest version of “Fedora KDE Plasma Desktop” (the latest version is 44, as of time of writing) yourself, but if you are unable to, here’s a link to that page:
- Download page for Fedora KDE: https://fedoraproject.org/kde/download
- Learn more about Fedora KDE: https://fedoraproject.org/kde/
KDE main homepage (for optional reading): https://kde.org
2.1 What is the difference between Fedora, Fedora KDE, and Plasma Desktop?
Fedora is the distribution of Linux that we’re going to be using. A Linux distribution is (in layman’s terms) a collection of packages that come with your operating system to make using it easier. This can include low-level things like the bootloader (Fedora uses GRUB) , kernel (Fedora 42 uses Linux 6.15), to high level things like the Desktop Environment (the GUI you see, depends on the Fedora Edition ), the Web Browser (Fedora uses Firefox), and much more.
All of these components can be swapped for other things, which makes a Linux install one of the most customizable and powerful systems out there! Linux runs on computers, phones (Android), toasters, Raspberry Pis, and even on the Mars Rover!
KDE e.V. is a German non-profit organisation that develops free and open-source software for everyone to use. One of them is the Plasma Desktop Environment (which many people call “KDE“), a highly customisable and user-friendly desktop-environment for Linux and some other OSes. Plasma also comes with its own suite of applications, like a file manager (Dolphin), a PDF Viewer (Okular), an Image Viewer (Gwenview ), some games like Solitaire and Minesweeper, and much more!
There are also other desktop environments that are available on Linux, an example being GNOME, a simple and user-friendly DE. GNOME has its own suite of applications (like Nautilus, Papers, Loupe for the GNOME equivalents of applications mentioned above).
The choice of a DE depends on your use-case and preference. We recommend KDE because it looks familiar to Windows users, is more customisable, and has better support for newer technologies like HDR and VRR. But it’s entirely up to you to choose which DE to use, since it’s your computer and Linux lets you choose.
Links to GNOME
Learn more about Fedora GNOME: https://Fedoraproject.org/workstation
Fedora GNOME download: https://Fedoraproject.org/workstation/download
GNOME homepage (for optional reading): https://gnome.org
2.2 Downloading the ISO
Click on the download button next to the ISO you want. If you have an Intel/AMD CPU (most of you will), download the x86_64 ISO. If you have an ARM CPU (Snapdragon X-Elite), download the aarch64 ISO. Click the little green download icon to begin downloading. Make sure you download the Live ISO, and not anything else.
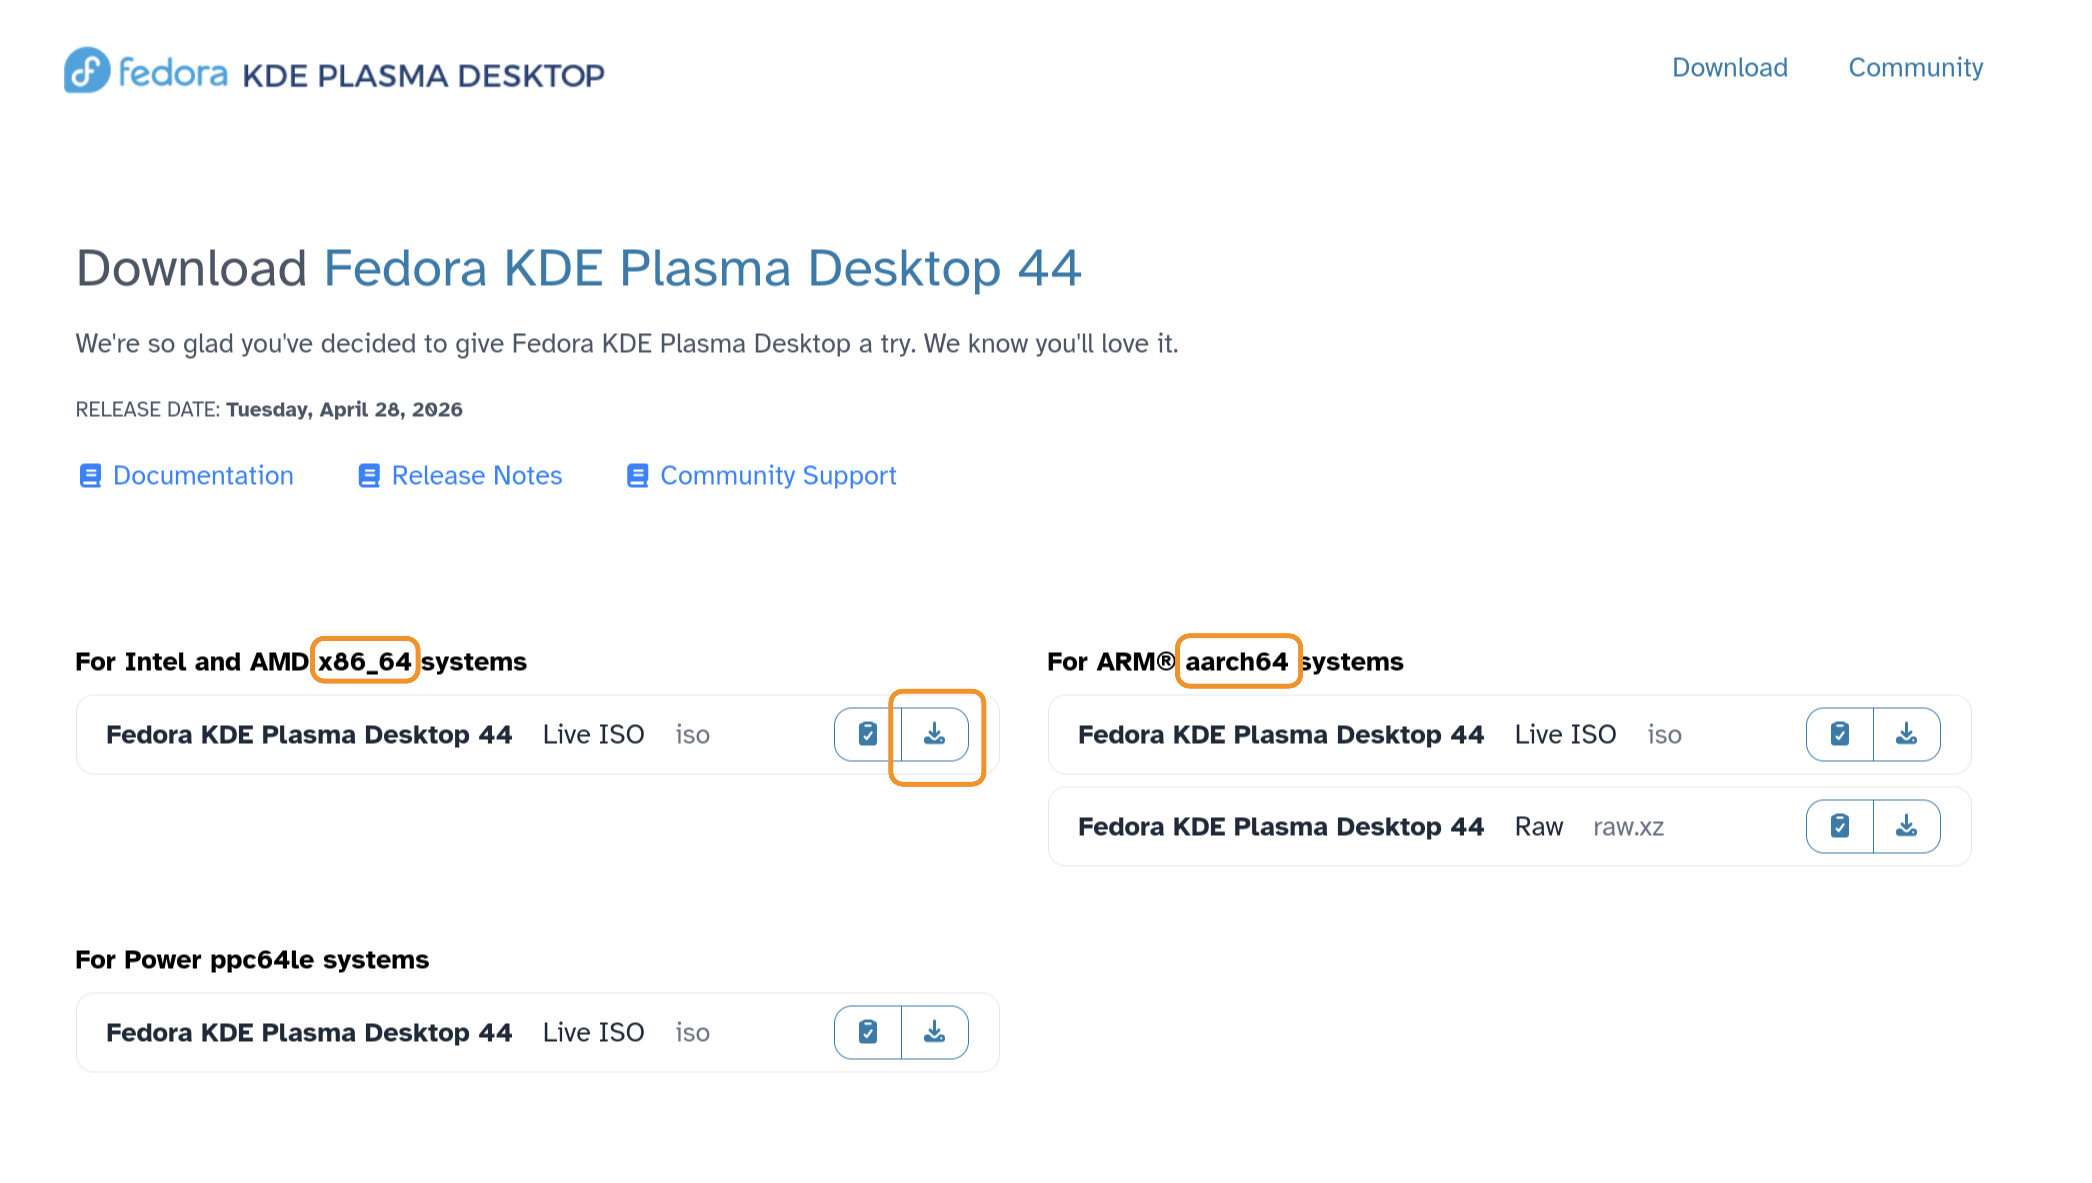
A screenshot of the Fedora KDE download page
2.2.1 ALTERNATIVE: Download using a Torrent Client (for advanced users)
Note: This section is only for advanced users who have torrented before. You may safely skip this section if you wish.
Downloading a large file (~3.2 GiB) through a browser may have issues if you’re on a slow/unreliable connection. You can use a torrent client like https://qbittorrent.org to download Fedora (and most other Linux ISOs), which is faster, more reliable, and contributes back to the open-source community if you seed (you should (I’m watching you)).
You can get the torrent file for Fedora ISOs from https://torrent.Fedoraproject.org.
Again, we recommend finding the download links yourself, but here are some direct download links in case you weren’t able to.
Fedora KDE x86_64 (for Intel and AMD) torrent: https://torrent.Fedoraproject.org/torrents/Fedora-KDE-Desktop-Live-x86_64-44.torrent
Fedora KDE aarch64 (for ARM computers) torrent: https://torrent.Fedoraproject.org/torrents/Fedora-KDE-Desktop-Live-aarch64-44.torrent
Fedora GNOME x86_64 (for Intel and AMD) torrent: https://torrent.Fedoraproject.org/torrents/Fedora-Workstation-Live-aarch64-44.torrent
Fedora GNOME aarch64 (for ARM computers) torrent: https://torrent.Fedoraproject.org/torrents/Fedora-Workstation-Live-x86_64-44.torrent
2.2.2 ALTERNATIVE: Download using Fedora Media Writer
You can also download the ISO using Fedora Media Writer, an application made by the Fedora team to flash ISOs to a pendrive. Skip to the Fedora Media Writer section to see instructions.
2.3 Checking the ISO’s hash
Please refer to the instructions given here to verify the integrity of the downloaded ISO file.
This process verifies that the ISO file you downloaded is properly downloaded to your computer and not corrupted, and is highly recommended. It only takes a few seconds, but may end up saving lots of troubleshooting time later on!
3. Flashing the Pendrive
Let’s flash the pendrive with the ISO so we can boot into it. There are tools made specifically for this purpose, we’ll dive into two of those here, Rufus (for Windows computers), and Fedora Media Writer (for all computers, intended as a backup option if Rufus doesn’t work for some reason).
Make sure you’ve inserted your pendrive into the computer. A final warning: This step removes all the data on your pendrive. Make sure you have backed it up (i.e. copied it to another location).
To avoid flashing the wrong drive, please disconnect any other external storage devices you may have connected (such as other pendrives, SSDs, CDs, etc).
During the flashing process, Windows may show some notifications about “something being wrong with the drive” or to “choose options” for it. Please ignore these notifications.
There are three ways to do this, we recommend rufus, you don’t have to do all three. If Rufus doesn’t work, try Ventoy. If that doesn’t work, try Fedora Media Writer.
3.1 [METHOD 1
] Using Rufus
Rufus is a tool that helps you flash an ISO file onto a pendrive.
It is a tool specifically built for Windows computers. If you’re using something else, you should use Fedora Media Writer (described in the next section).
Download Rufus from https://rufus.ie. For Intel and AMD computers, download the x64 version. For ARM computers, download the ARM64 version. You can download the “Portable” version if you like (i.e. it does not have an installer, but the direct executable file is downloaded instead). The Portable version is easier to remove from your computer (you don’t have to go to Settings and manually remove it, just delete the downloaded file).
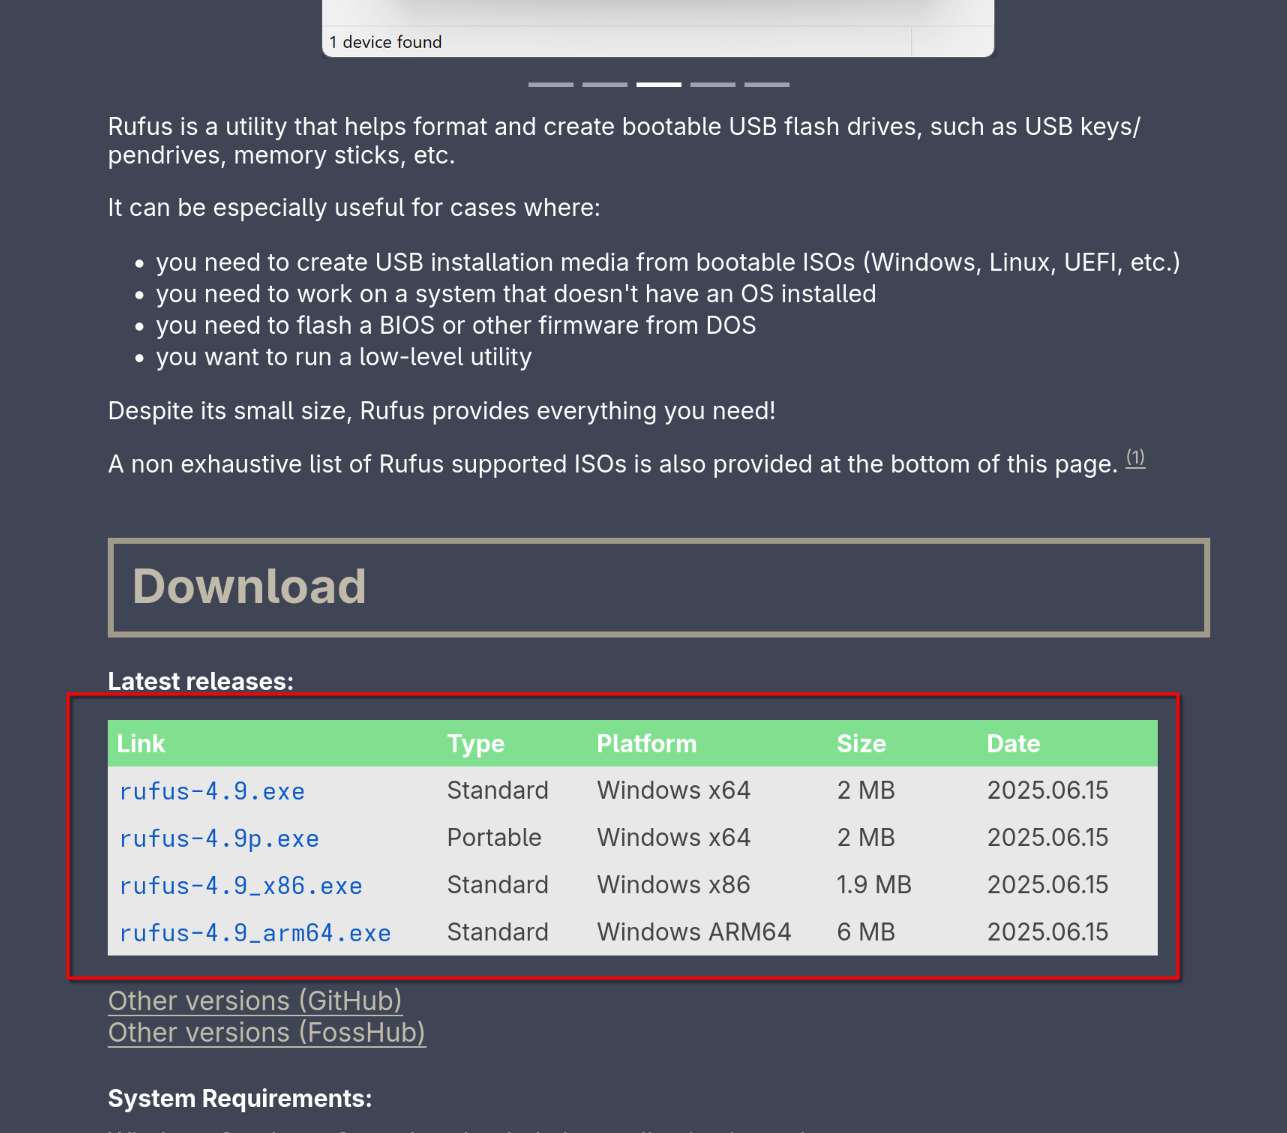
A screenshot of the Rufus download page
Next, open Rufus (you may click “No” on the update confirmation dialog that appears), it should look like this:
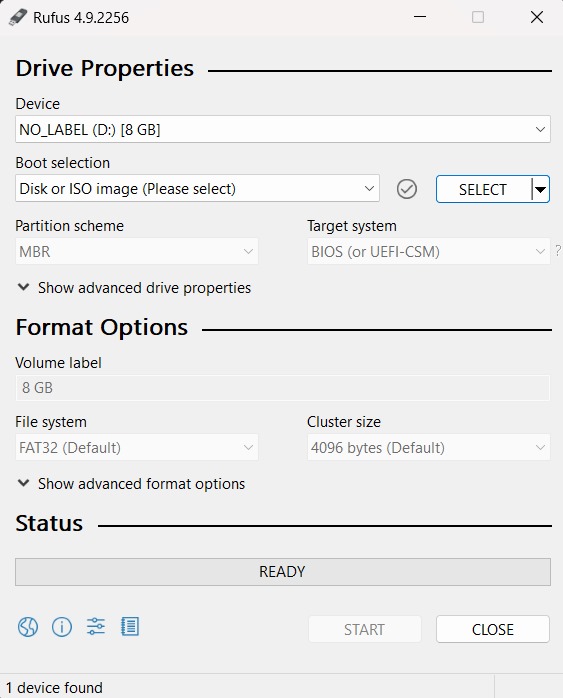
A screenshot of the start menu of Rufus
Follow these steps:
Select your pendrive from the dropdown list.
Press the SELECT button (make sure the dropdown next to it says Disk or ISO image).
Select the ISO you downloaded in the file picker that appears.
Do not make any changes to any other settings.
Rufus should look similar to the below image:
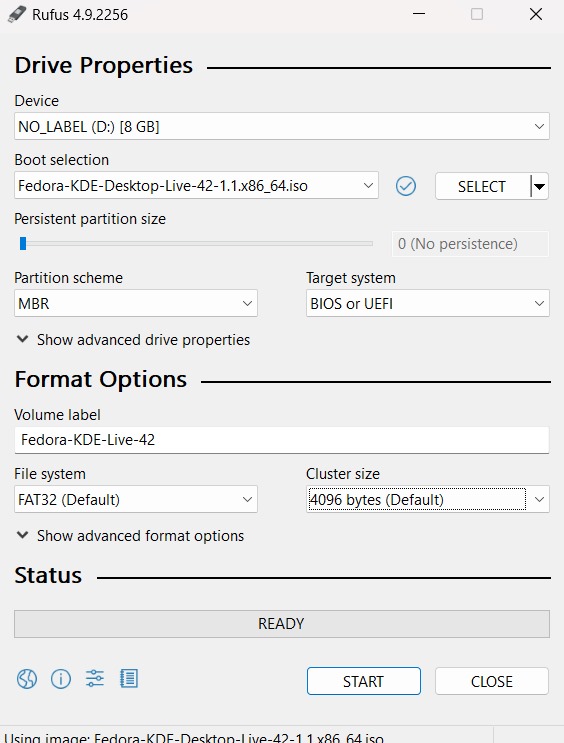
A screenshot of an example of the options to be selected
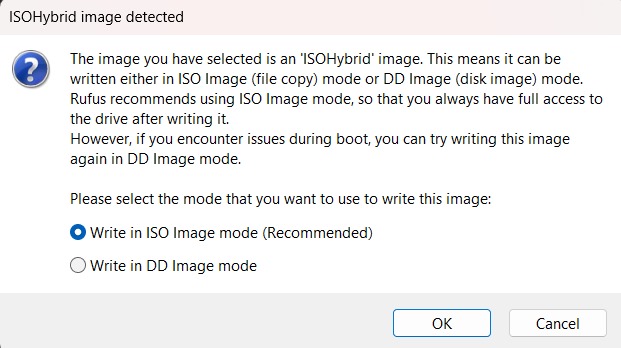
Next, click the “START” button to flash the pendrive. Use the ISO Image mode as recommended. If this pendrive doesn’t boot during the boot process described later, re-flash using DD mode.
If a warning about the GRUB version comes up, select the option to download the latest GRUB from the internet (usually “Yes”).
Say “OK” to the warning about disk data erasure popup to begin flashing your pendrive!
After it’s done, Rufus should give you a notification/sound and say its status is READY again. You may close Rufus when this is done.
A screenshot of the last step
3.2 [Alternative 2
] Using Ventoy
Ventoy is a tool that helps you flash and boot ISO files from a pendrive.
It is a tool that works on multiple platforms, including Linux, Windows and MacOS.
Download Ventoy from https://www.ventoy.net. On the
Download page, select the appropriate version for your system. For
windows, download the .zip file, extract it, and run
Ventoy2Disk.exe.
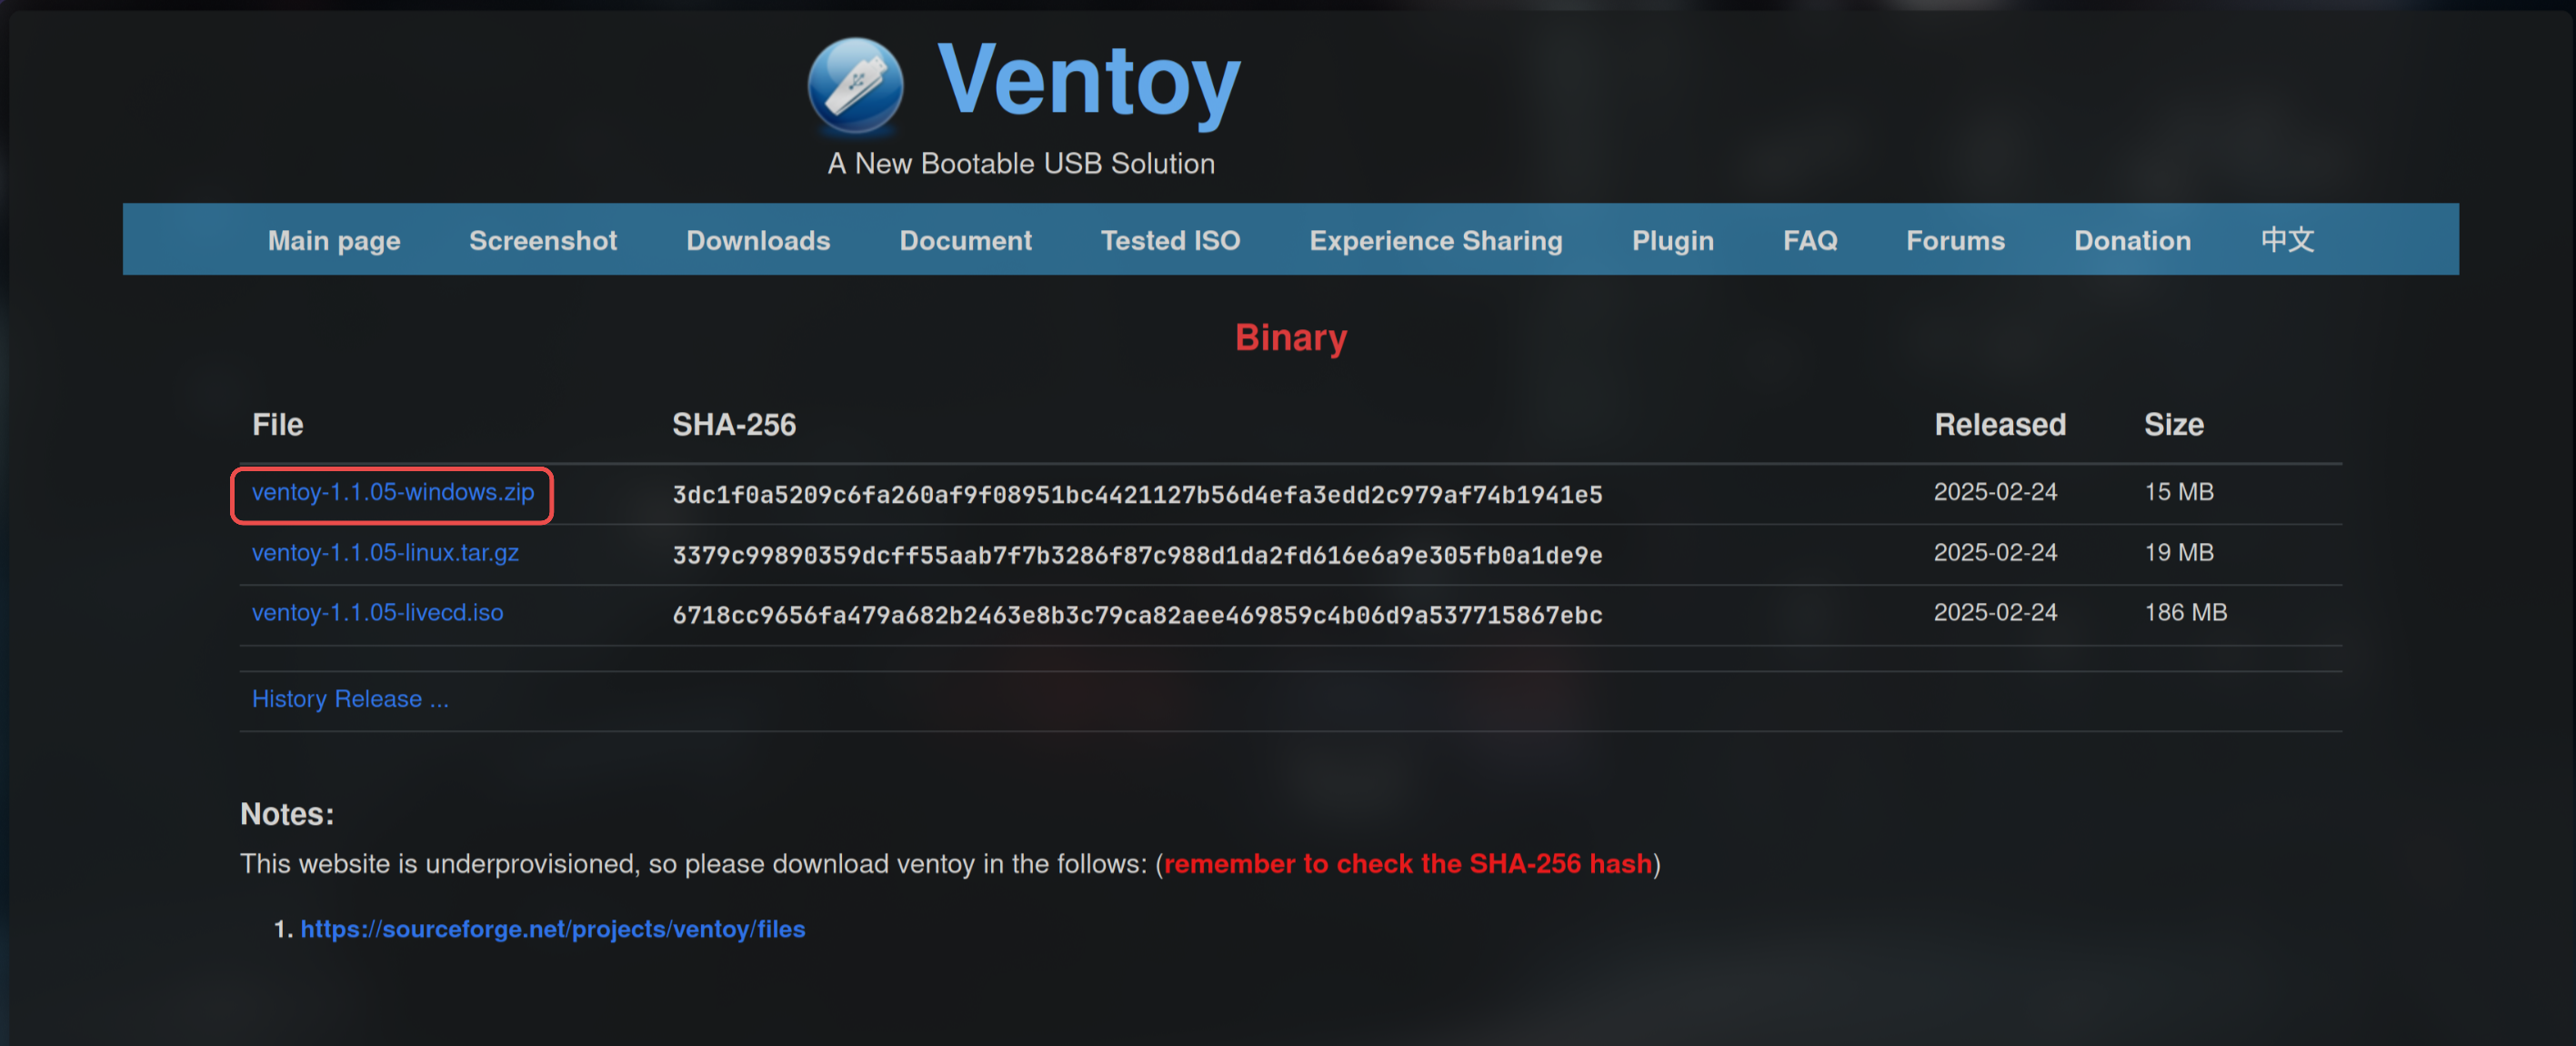
A screenshot of the Ventoy download page
Once you open Ventoy, it should look like this:
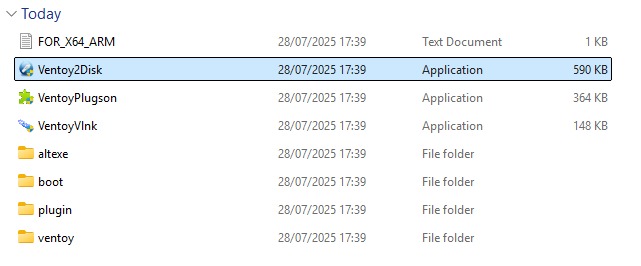
A screenshot of Ventoy once downloaded
Follow the following steps:
Select your pendrive from the dropdown list
Click the
Installbutton to install Ventoy to the selected USB drive.Confirm the warning prompts that appear (ensure you have backed up the data in the disk before)
Once the installation is complete, the USB drive will can be used for ISO files
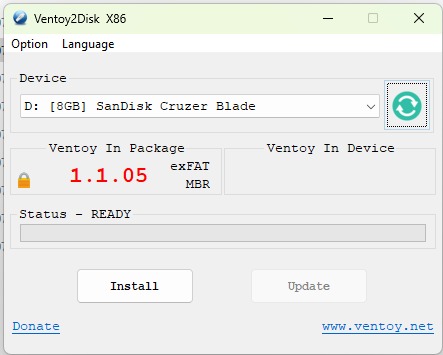
A screenshot of Ventoy while flashing the ISO
Next, copy the ISO file downloaded to the Ventoy-formatted USB drive. You can use the drive for booting once done. During boot, Ventoy will show the list of available ISO files to select from.
3.3 [Alternative 3
] Using Fedora Media Writer
Fedora Media Writer is a pendrive flashing tool developed by the same team as the Fedora Linux distribution. We keep this option as a backup because Rufus generally has more success with bespoke computer configurations. Fedora Media Writer only supports x86_64 devices.
Please refer to the instructions given here to download and use Fedora Media Writer.
Note that while writing the ISO image to the USB device, you may choose the “Download automatically” option and select the “Fedora KDE Plasma Desktop” option from the dropdown instead of “Fedora Workstation”. Once you click “Next”, make sure to select version 44, and choose the correct hardware architecture. See this section to determine your hardware architecture.
4. [Only Win 10 Pro / Win 11
] Disabling BitLocker Encryption
Note: This step is only necessary for Windows 10 Pro and Windows 11 (all editions) devices. You can skip this section if you have Win 10 Home or an older edition of Windows.
BitLocker is Windows” solution for full-disk encryption, i.e. it encrypts the contents of your hard drive. It is a nice feature, but unfortunately, it prevents dual-booting with Linux in an easy way.
There is a way of keeping BitLocker enabled while having Linux dualbooted, but that process is very advanced. Also, keeping BitLocker enabled will prevent you from accessing your Windows files from Linux.
For now, we will have to disable this feature to proceed with the installation.
Please note that if you forget to disable BitLocker encryption, it may render your Windows installation in a partially or fully bricked state.
4.1 Disabling Encryption
To disable BitLocker encryption:
Search for “device encryption” in the start menu.
Click the first option that appears (should open the settings app).
Turn the toggle for “Device Encryption” off if it isn’t already.
Confirm “Turn Off” in the dialog box that appears.
Wait until the decryption finishes.
4.2 Alternative Method
Only do this method if the above one does not work, i.e. you are unable to find the “Device Encryption” settings page.
Search for “Bitlocker” in the start menu and open the control panel page that comes.
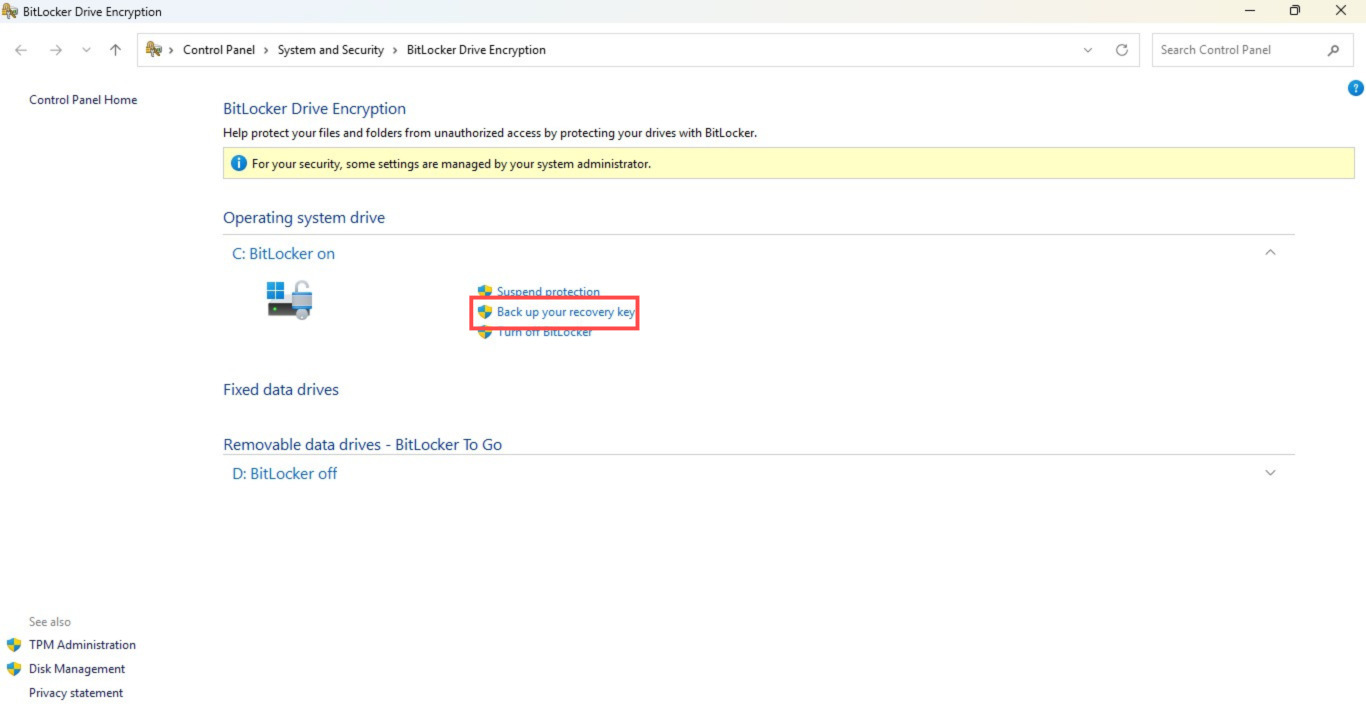
A screenshot of the BitLocker settings page
Select the disk you want to disable BitLocker on (usually the C: drive).
Backup the BitLocker key if you wish to keep it (optional).
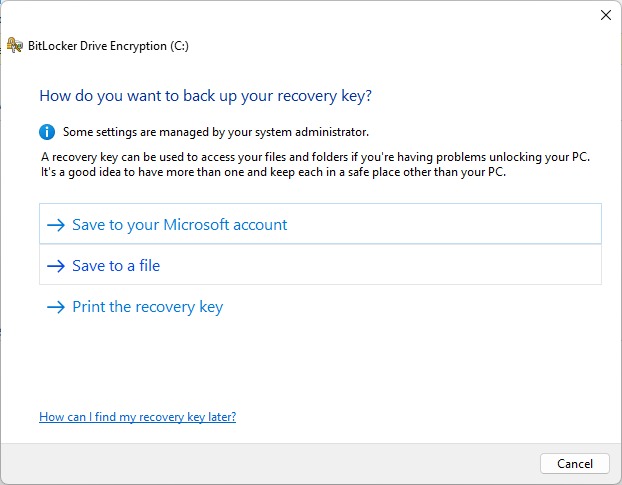
A screenshot of saving the BitLocker encryption key
Click the “Turn off BitLocker” option.
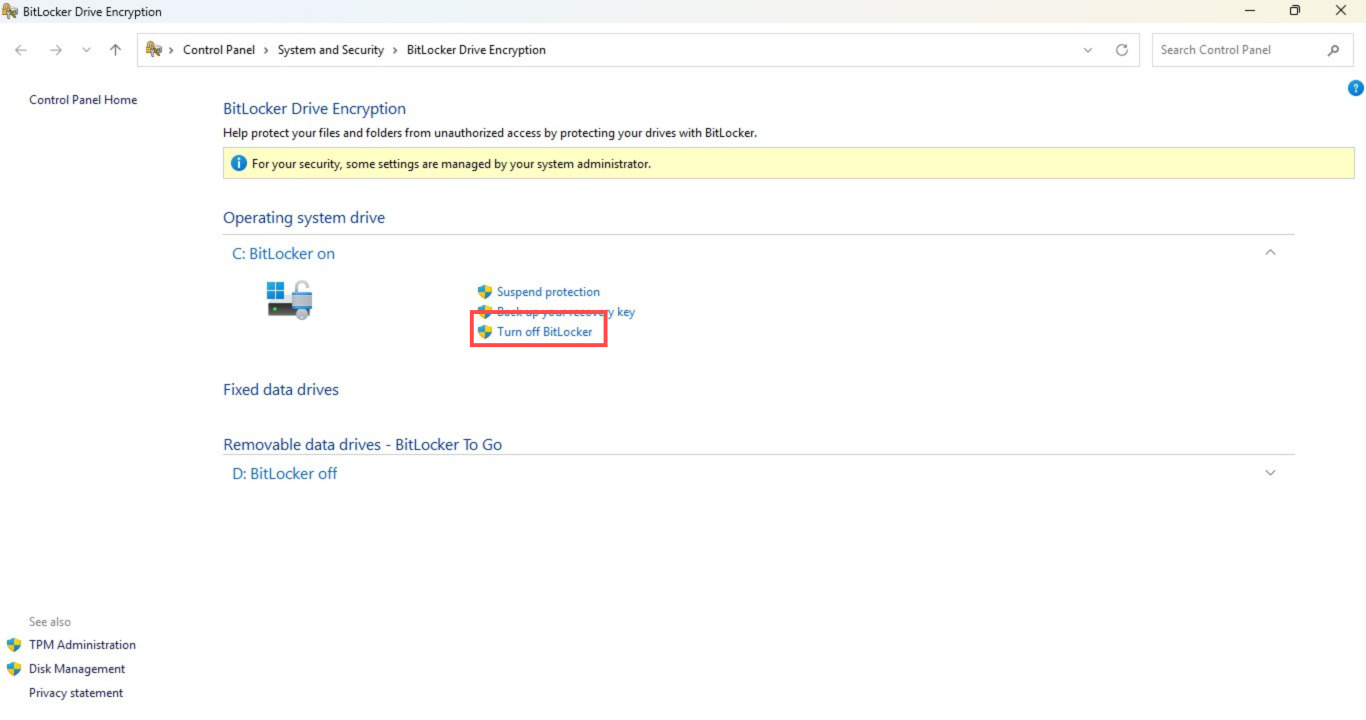
A screenshot of disabling BitLocker
This process will take a bit of time (depending on the size of your drive) to complete.
If you don’t find any BitLocker option, your device may not support BitLocker. This usually happens on Windows 10 devices.
5. Setting a Password
If you disable Secure Boot (in one of the steps below), Windows automatically disables any Windows Hello sign-in methods like PIN, Face, or Fingerprint. To be able to sign-in to your device, you must have the Password sign-in method enabled before you disable Secure Boot, if you really need to. To do so:
Search for “windows hello” in the start menu.
Click the first option that appears (should open the settings app).
Click on the “Password” option under the “Ways to sign in” heading.
If you are signed in to a Microsoft account, make sure you know the Microsoft account password. If you do not remember it, please reset the account password or sign in with a different account.
If you are not signed in to a Microsoft account, create your own password.
6. Creating space for Fedora
Now, we need to partition the computer’s hard drive into two to give some space for Fedora. For most college-work and daily tasks, giving 128GiB of space to Fedora should be enough. We recommend giving upto 384GiB of space if you have a total of 1TiB, 256GiB if you have a total of 512GiB, and at least 80-100GiB if you have a total of 256GiB or lesser.
If you plan on using Fedora/Linux more faithfully and want to install lots of software and games on it, try giving as much space to Fedora as you can, leaving windows with about 40GiB of free space left.
Files on your Windows computer can be viewed under Fedora, so you don’t have to worry about moving important stuff onto another drive to copy it over to Fedora.
Your computer’s drives may already be partitioned into some units (called partitions/volumes) by Windows, and you may have multiple drives in your computer. This section comes down to your preference of which partition of your drive to shrink to make space for the new Fedora volume that will be created. Fedora will be installed onto this partition of your drive.
To partition your drive, open Windows Disk management by following one of these two methods listed below:
Right-click the start button and choose Disk Management
Type “Disk Management” and choose “Create and format hard disk partitions” in the start menu
The window that opened should look like this:
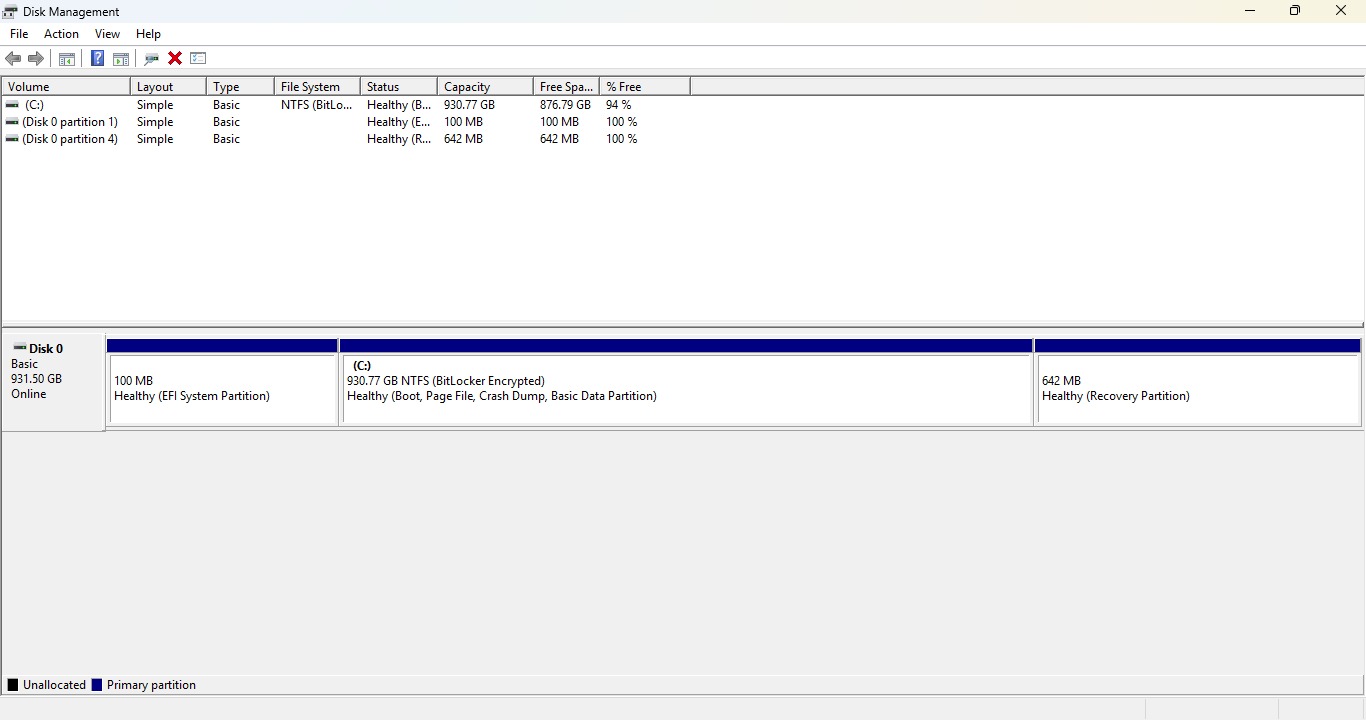
A screenshot of the disk management window
It might look different for you — you may have more/less drives with more/less partitions.
Find the drive with the “Windows C:” partition. If you have a D: drive or an E: drive, you may have multiple partitions listed, in which case, find the largest partition which is NOT an EFI or recovery partition to shrink to give space to Fedora. You can use your file explorer’s This PC page to see which drives map to which partitions if it isn’t clearly obvious from just this program’s screen.
Once you’ve selected the partition to shrink (I choose the Windows C: partition), right-click it and click the “Shrink Volume option”.
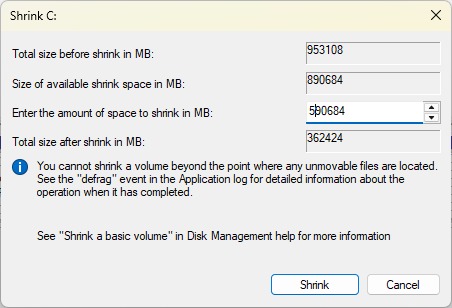
This dialog should appear.
A screenshot of the Shrink Volume Window
In the input, enter the amount of space to give to Fedora in MiB (Windows displays MiB as MB, the difference between MiB and MB is left as an exercise to the reader). 1 GiB is 1024 MiB, so use your computer’s calculator to find the equivalent amount in MiB.
For example, if I wanted to give Fedora 128 gigabytes of space, I’d
type 131072 (128*1024) in the input box.
Do choose wisely, as changing this number in the future will require you to remove and re-install Fedora.
Click “Shrink” to shrink the partition.
You should now have a fresh unallocated volume show up.
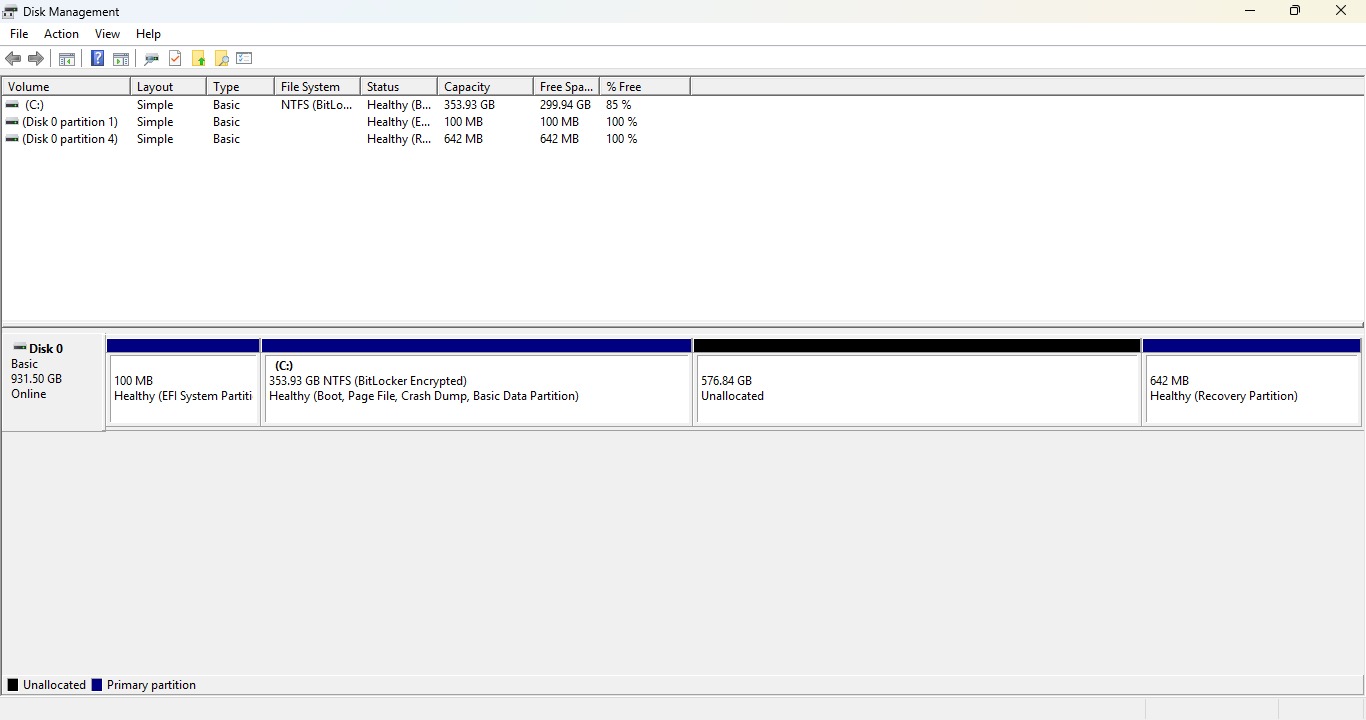
A screenshot of the disk information after partition
You may close Disk Management.
7. Boot into your computer’s UEFI Settings
Before proceeding into the UEFI, please make sure you have your pendrive plugged in. This is to allow the UEFI to show you the pendrive’s entry in the boot order selection page (covered later).
Now you have to boot into your computer’s UEFI (Unified Extensible Firmware Interface) settings. A computer’s UEFI is (in layman’s terms ) the part of the computer that is responsible for starting the operating system and is generally the first thing that starts up when you boot your computer.
Your computer’s UEFI has some settings that you have to change to allow you to boot into your Fedora pendrive.
Note: The UEFI Settings may also be (incorrectly) referred to as the BIOS settings by some manufacturers and websites. Other names for it are Boot Options, Firmware Settings, etc.
You can boot into the UEFI settings from Windows by following any one of these two steps:
7.1 Method 1: Advanced Startup
Windows has a feature called Advanced Startup that allows you to, among other things, boot into the UEFI Settings.
To get into advanced startup mode, follow any one of these two steps:
Open Command Prompt, and type the below command in it and press enter.
shutdown /r /o /f /t 00OR
Open the start menu as if you were going to restart your computer, but hold down Shift on your keyboard while you press the Restart button.
Boot into the UEFI Settings:
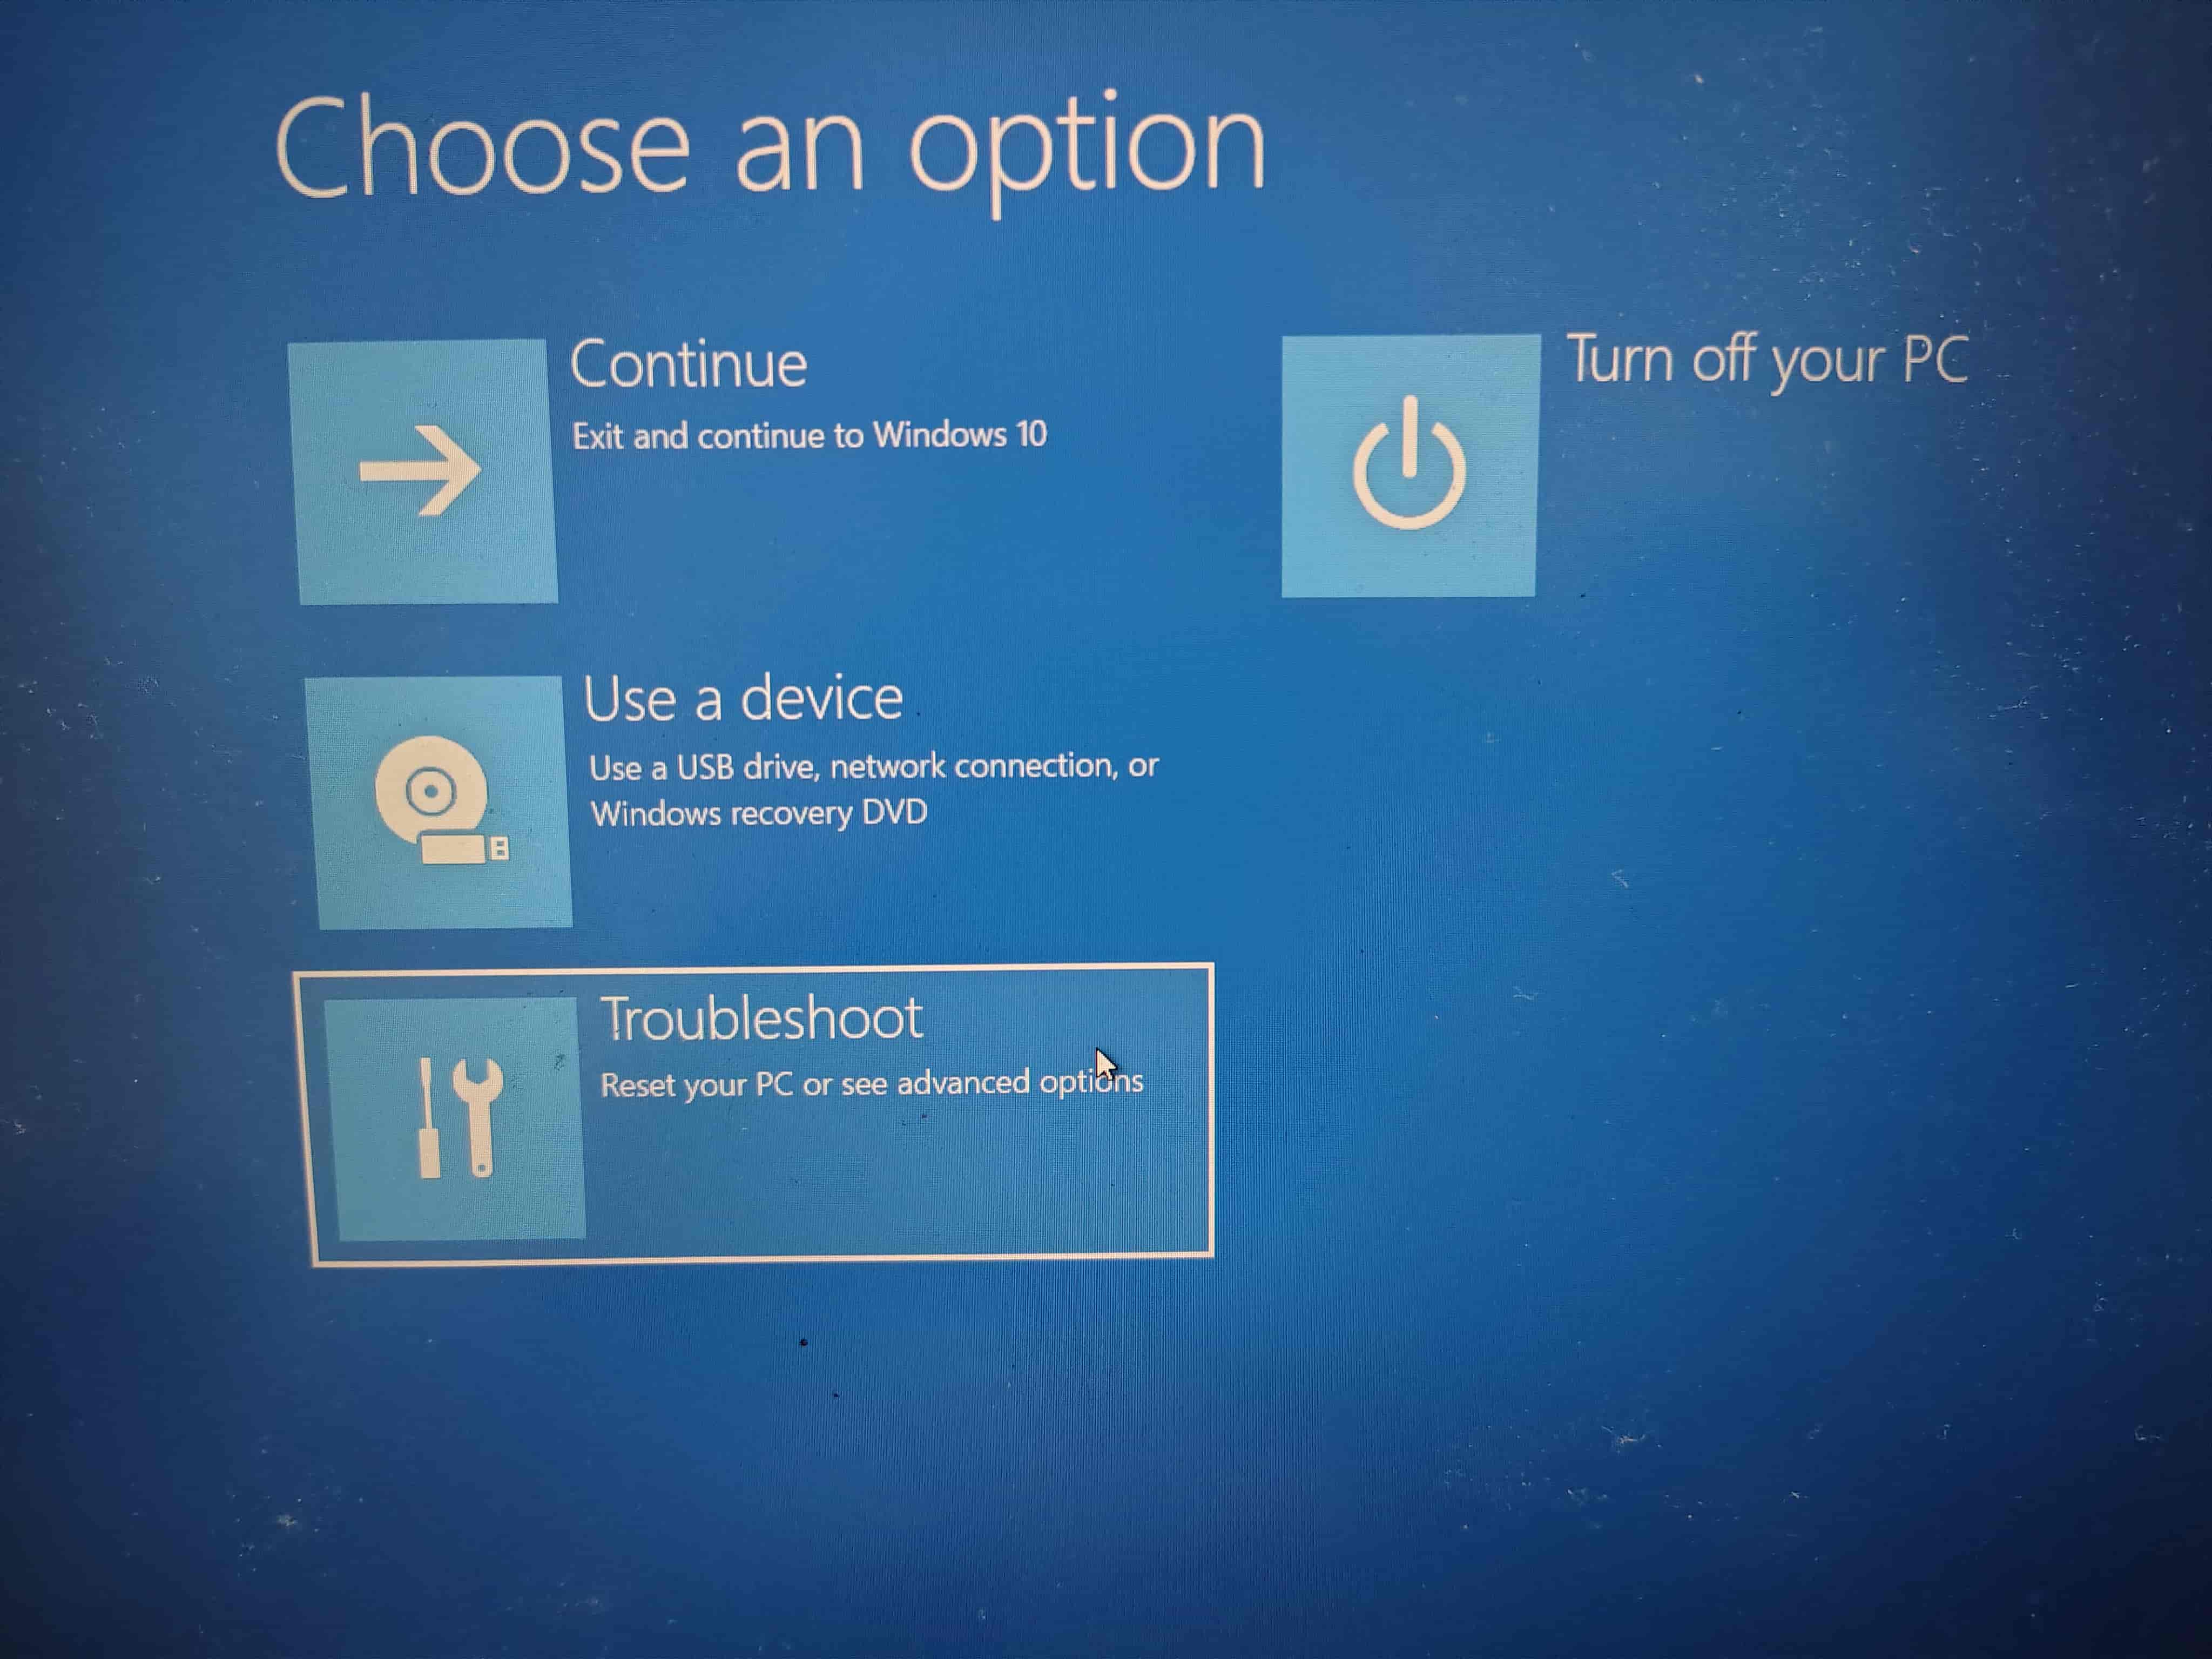
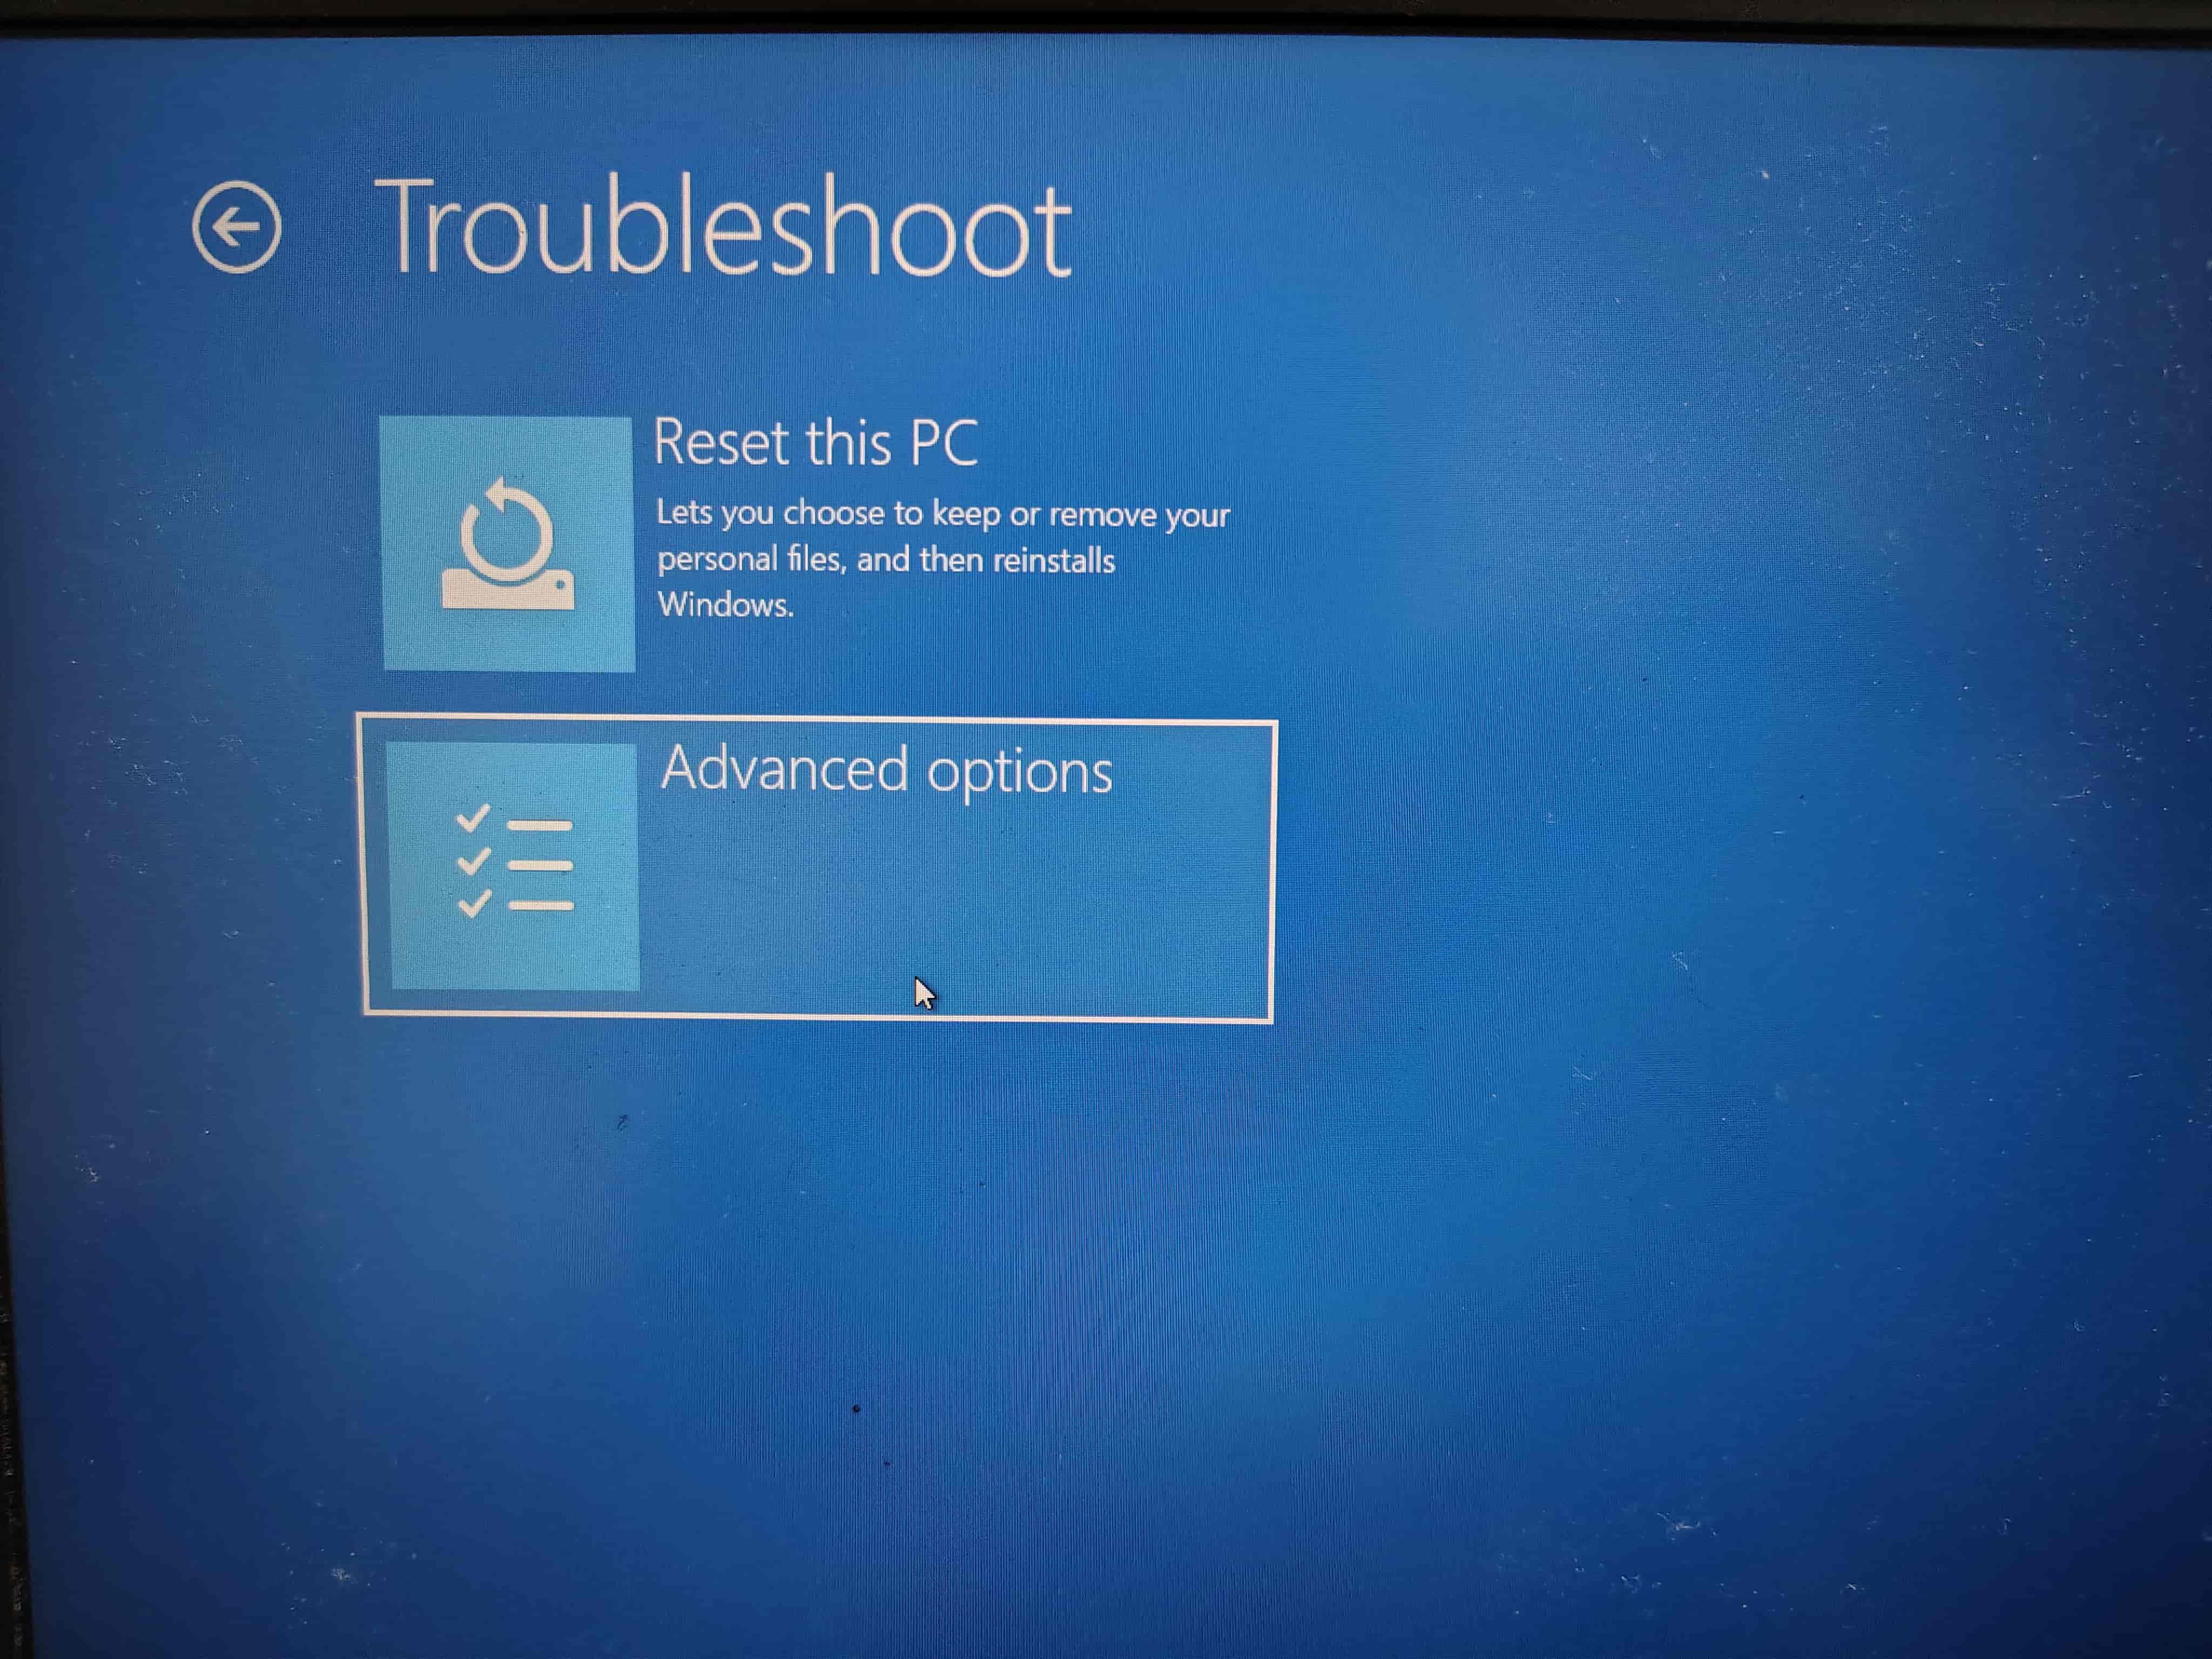
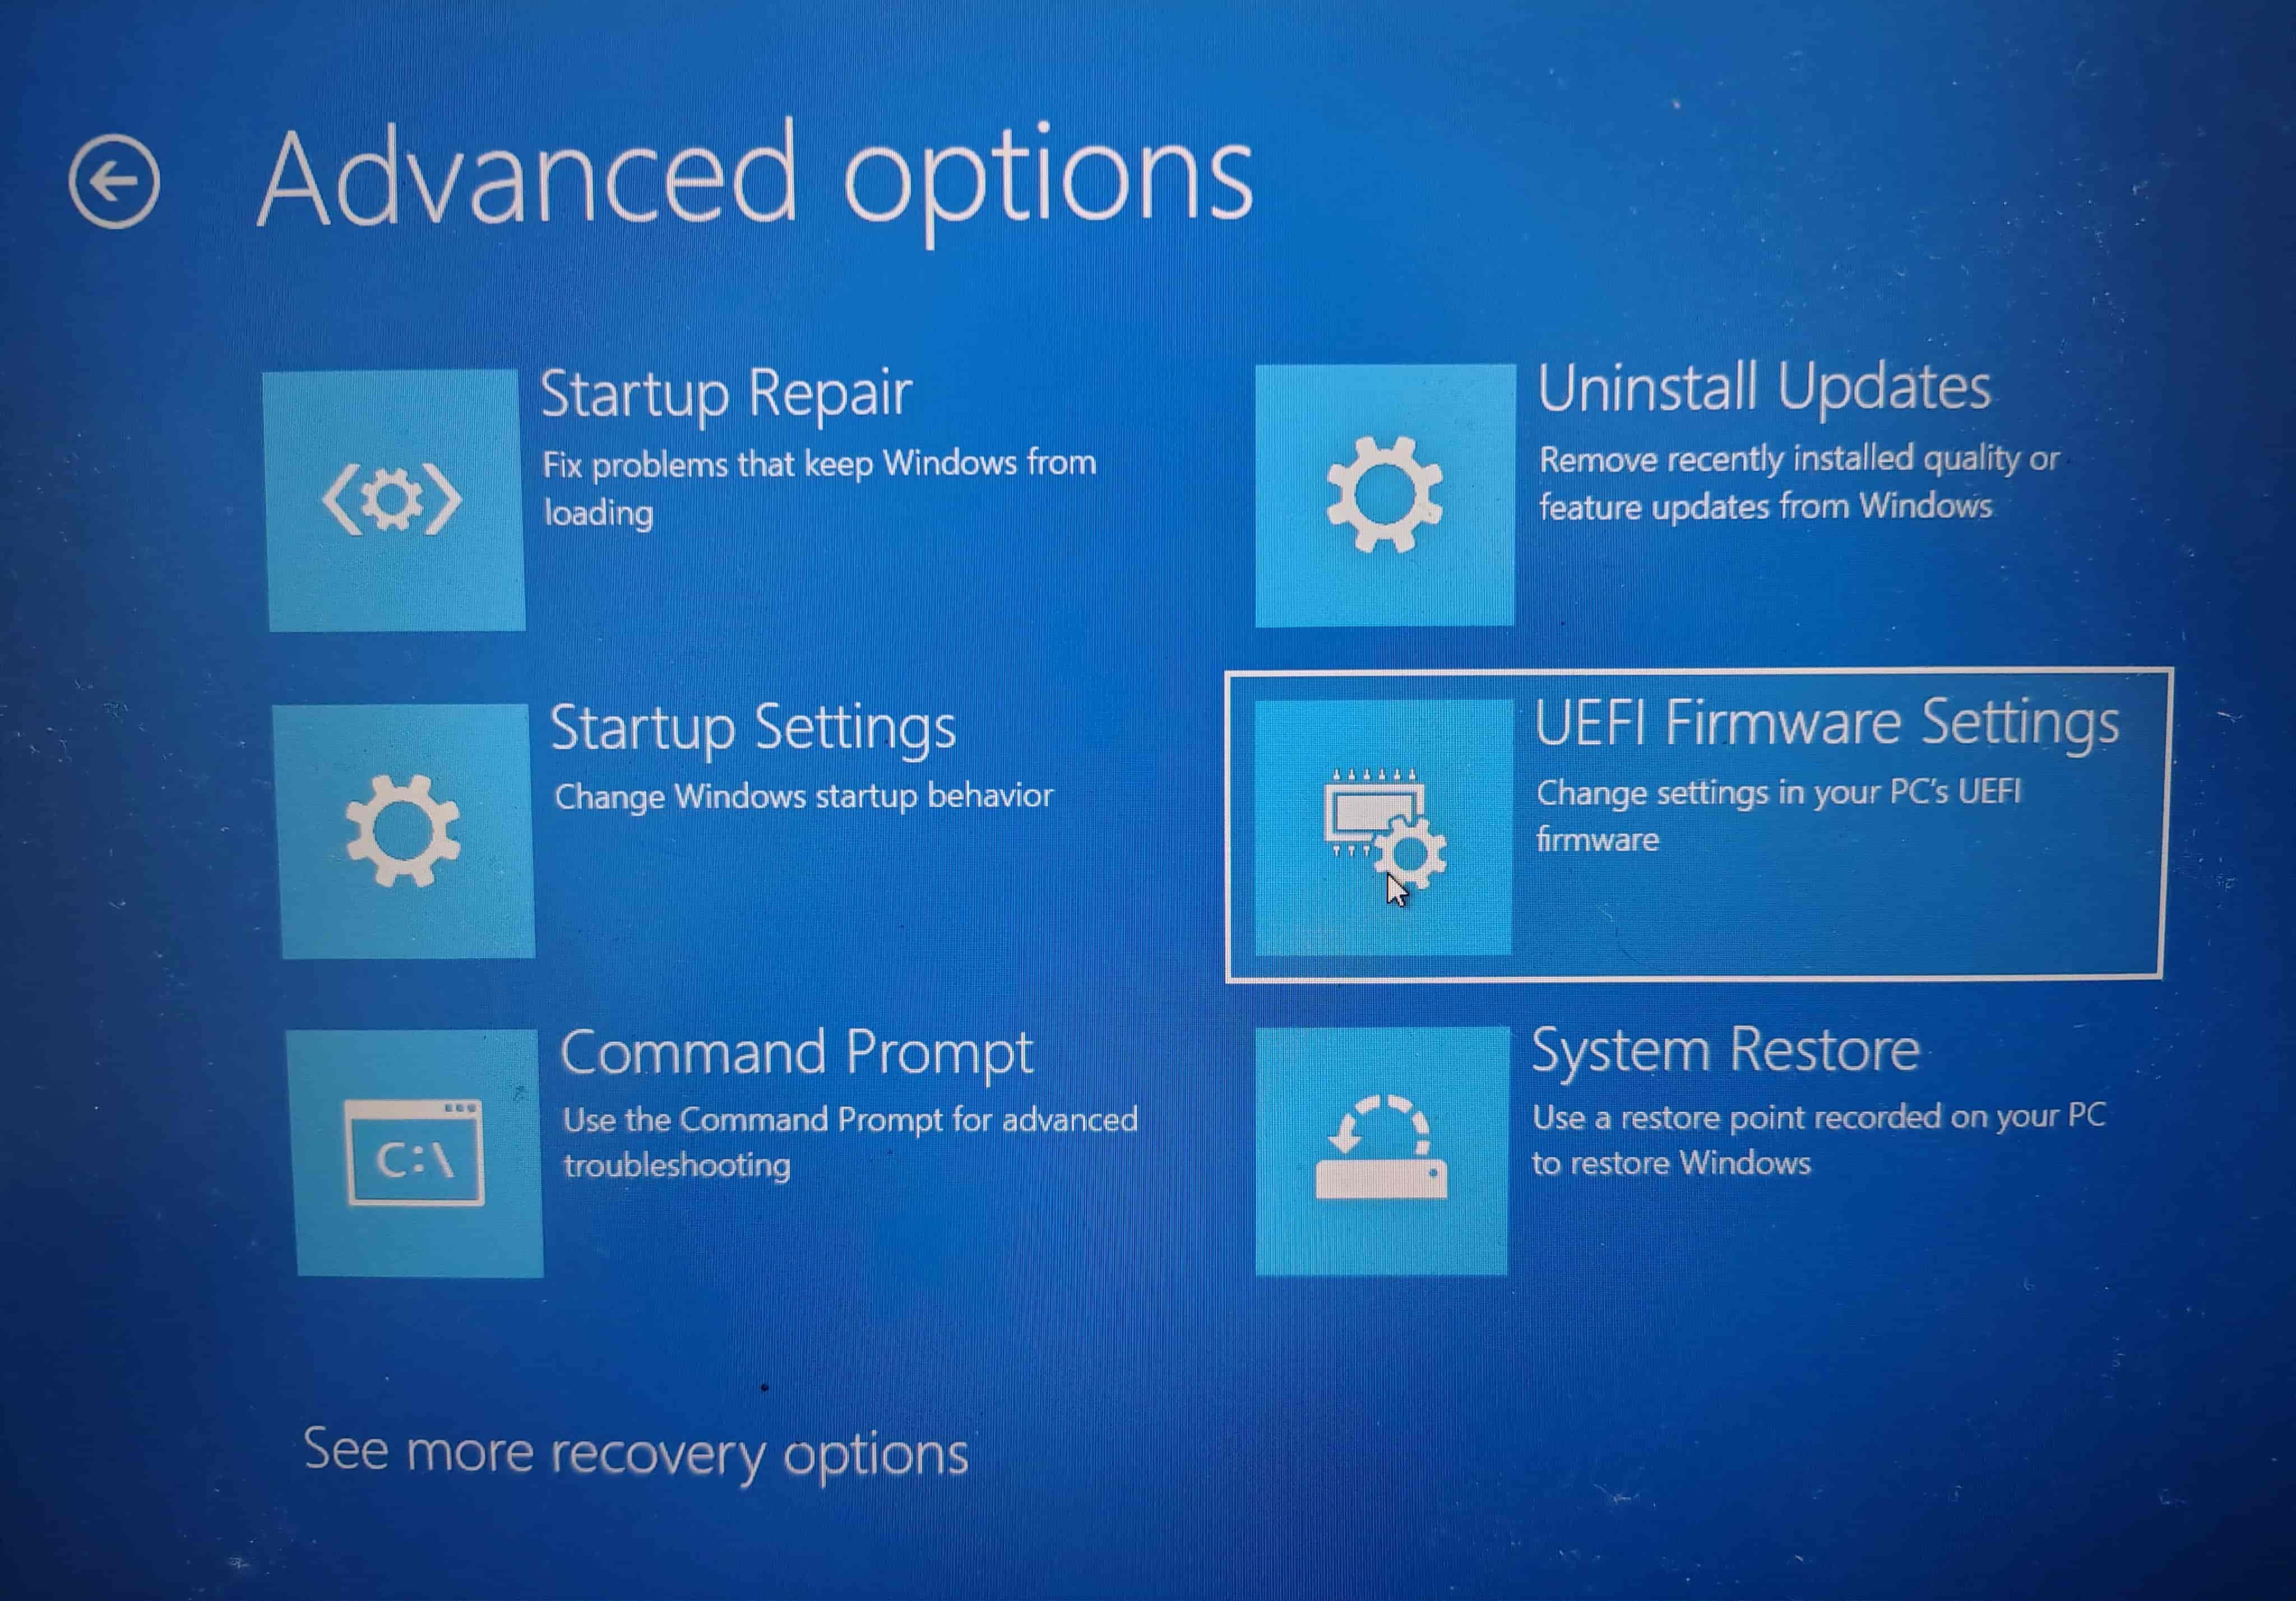
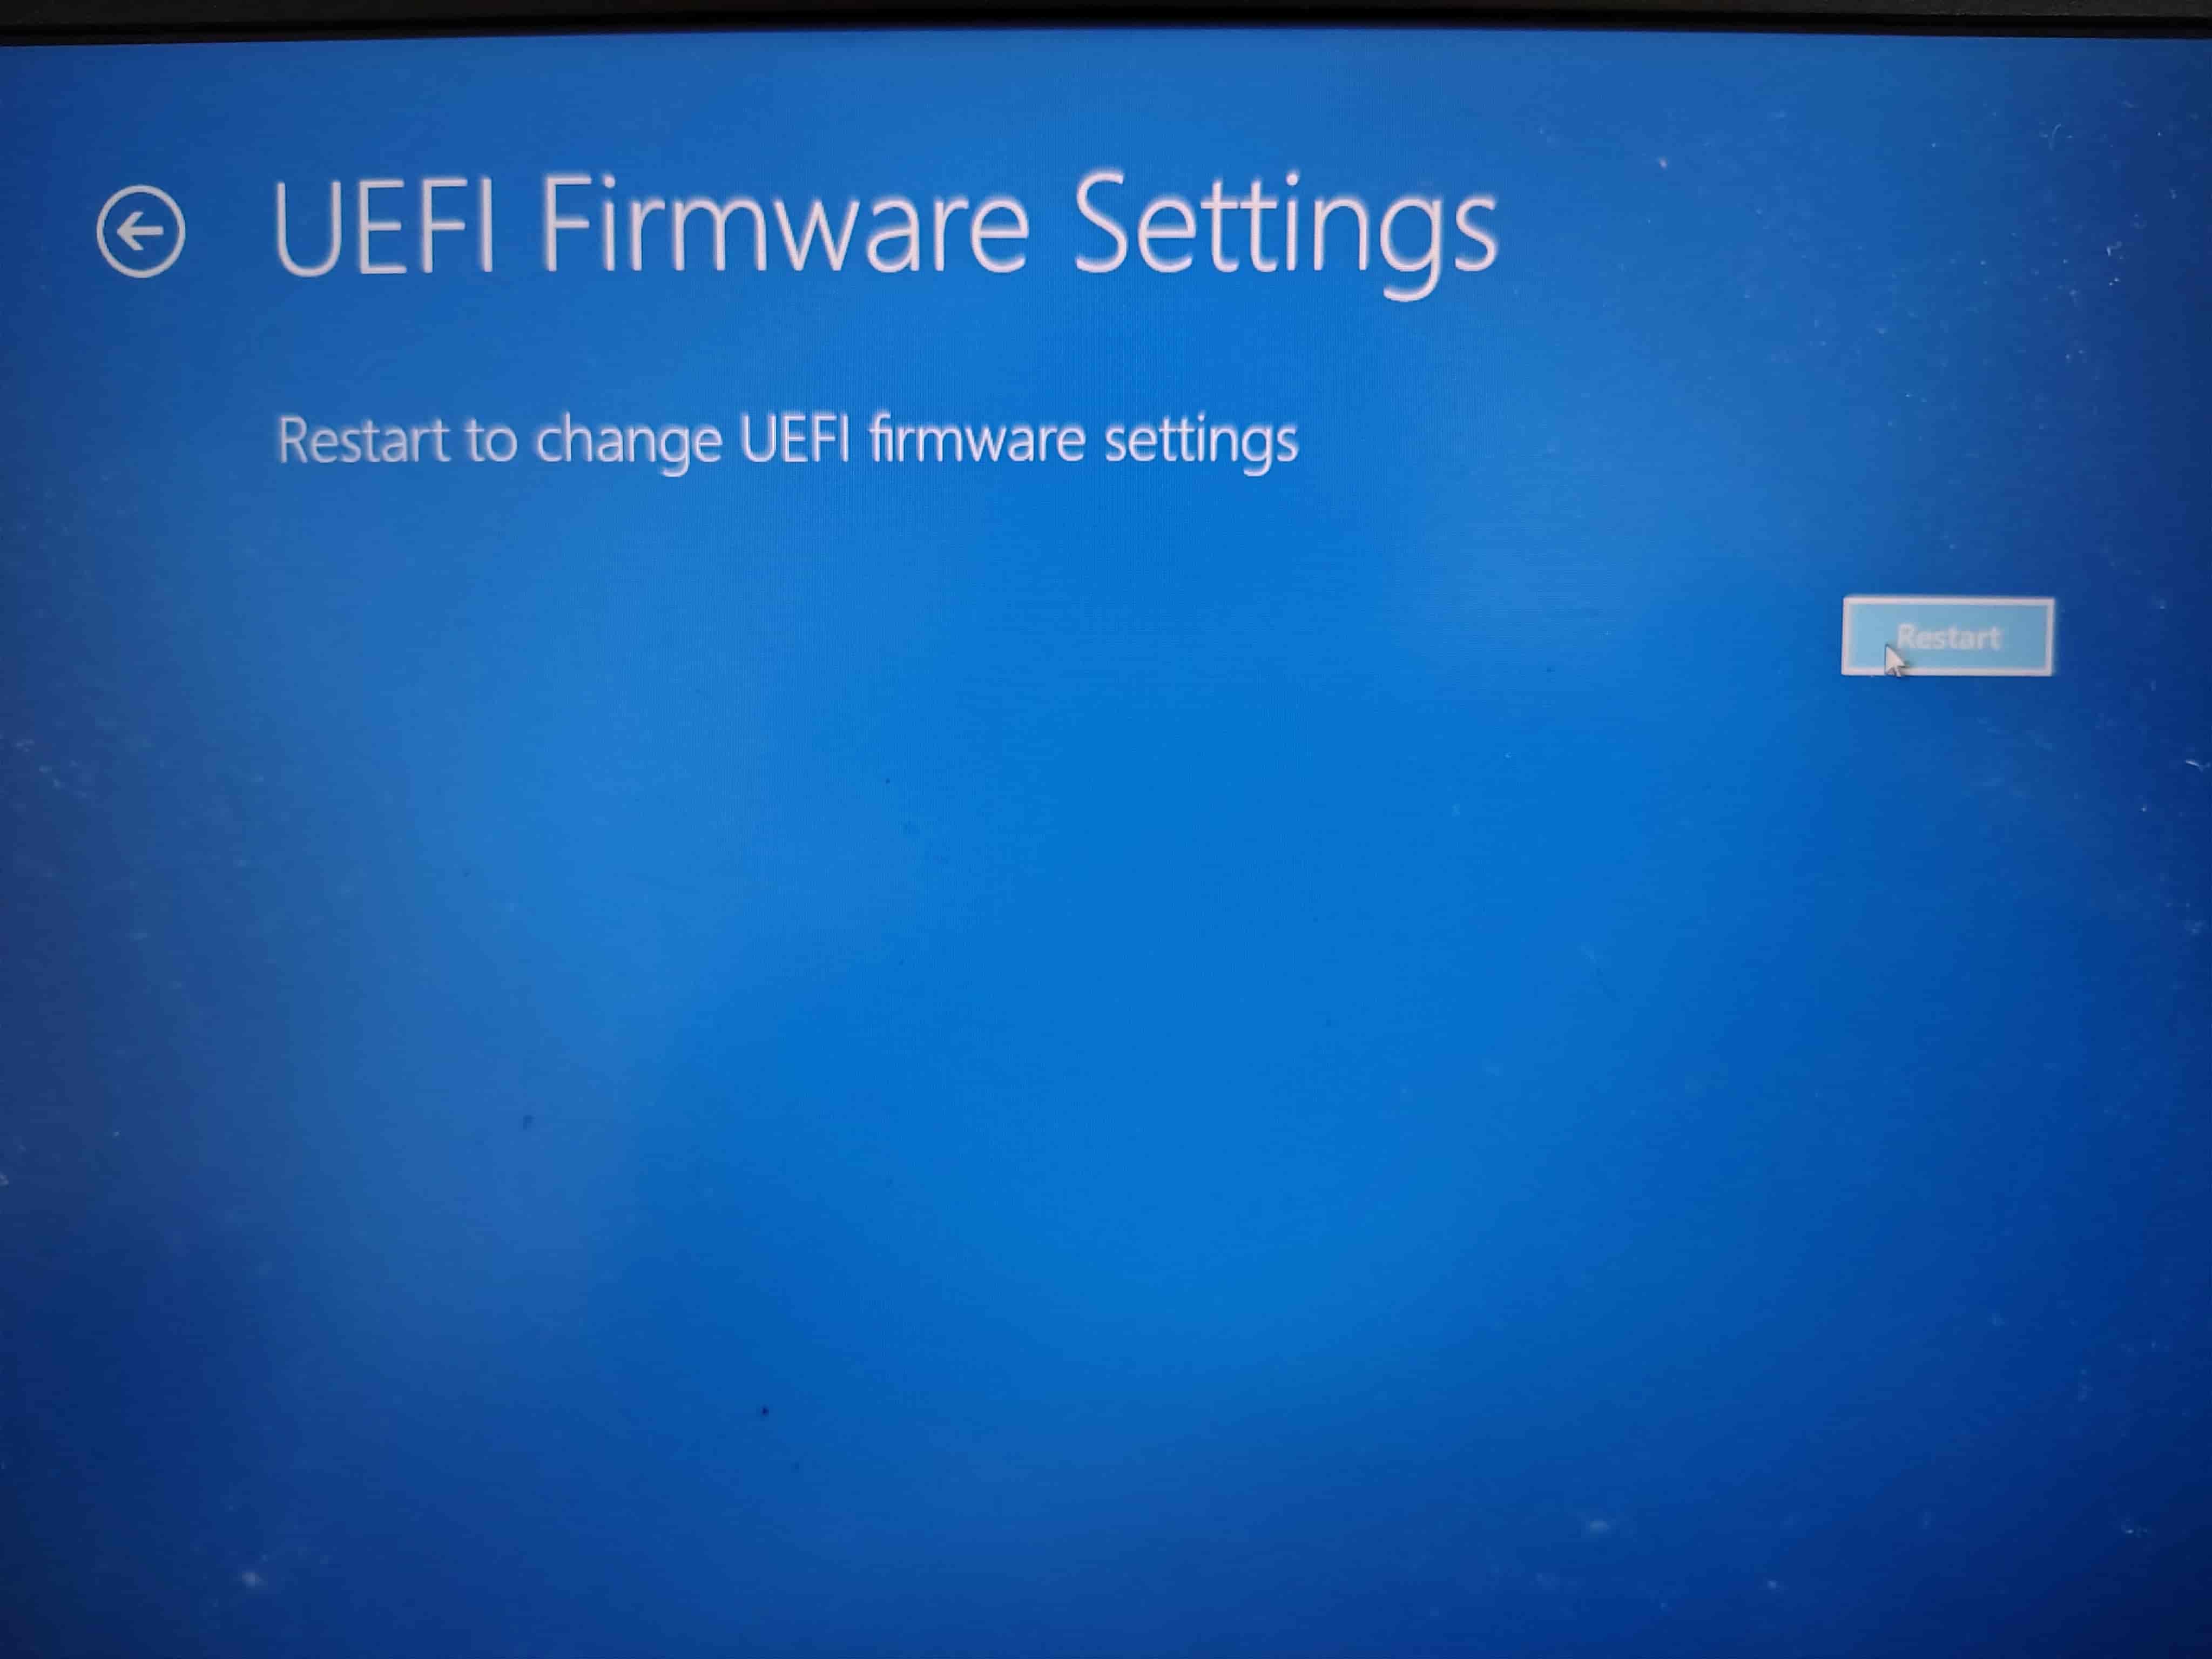
When you’re in advanced startup, press Troubleshoot, then Advanced Options, then click UEFI Firmware Settings, and finally click Restart to boot into the UEFI settings.
|
|
|
|
7.2 Method 2: Keyboard smashing
You can open the UEFI settings by repeatedly pressing a specific key on your keyboard as soon as the machine starts up. The specific key depends from manufacturer to manufacturer and laptop to laptop.
It’s usually one of F2, F7, F12, Delete, Enter, etc. Here’s a list of the keys for some common manufacturers:
Acer: F2 or DEL
  ASUS: F2 or DEL
  Dell: F2 or F12
  HP: ESC or F10
  Lenovo: F2 or Fn + F2
  MSI: DEL
If these do not work, you’ll need to find the key for your device, by searching the internet. Search for “How to open BIOS on <laptop brand>”, replacing <laptop brand> with your laptop’s name and model (for example Framework 13, Lenovo Thinkpad, etc.).
Once you find the key, restart your computer, and press that key up and down rapidly. You should directly be dropped into the BIOS.
8. Change Boot Order and (optionally) Disable Secure Boot
UEFI firmware settings look different from computer to computer. Older laptops will have a screen that is only controllable using keys on your keyboard, while newer ones have mouse support. I will not be providing screenshots here since UEFIs are different from computer to computer.
Please feel free to use an internet search engine to get help with this step. Stick to your manufacturer’s official website if they have instructions there. Popular YouTube videos may also be consulted.
Get familiar with your UEFI’s control scheme. If it’s keyboard only, it’s usually listed at the bottom of the screen.
Next, you have to find the “Boot Order” listing. It’s usually present in the “Boot” category. It looks like a changeable list of “bootable” secondary storage media like Hard Drives, CDs, pendrives, etc. You must move your pendrive to the top of the list, if it isn’t there already. Please look at the control scheme to know how to do so. Usually to move entries, it’s the F5/F6 or +/- keys on your keyboard, but please check instead of blindly trusting this guide. If you find multiple USB entries, move them all to the top.
After that’s done, you can “Save and Exit” from the BIOS (usually the F10 key, but please check). The computer should now boot into Fedora from the pendrive.
You’ll see a GNU GRUB boot menu, don’t worry about that, either wait for it to automatically select, or choose “Test this media and start Fedora 42” from the list. Booting may take a few minutes.
Note that if you do not see the GRUB boot menu, or the computer reboots into Windows, you will need to disable Secure Boot. Before disabling Secure Boot, please read the instructions in this section. Then, re-boot into the BIOS/UEFI menu, and find an option called “Secure Boot” and disable it. It’s usually present in the “Security” category of your UEFI.
8.1 Using the boot menu
If the boot order page in the UEFI didn’t work, most laptops allow you to choose a boot device. You can find the Boot Menu key using the same instructions as finding the BIOS key as outlined here.
You can also choose the boot device from the Advanced Startup part of Windows too.
If you haven’t disabled secure boot, you might get a big blue screen that says something about security violation failed (like below).
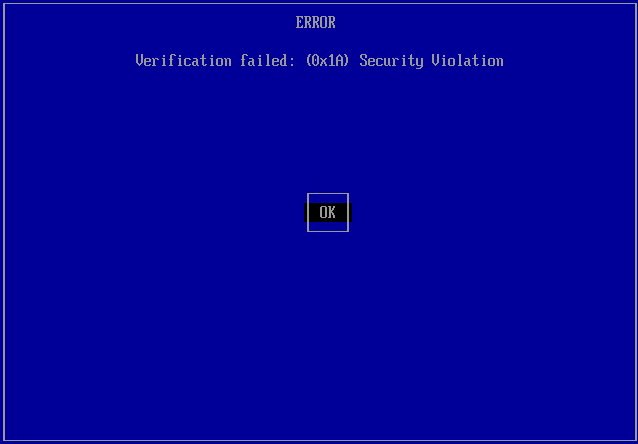
Just click ok, then you will be asked to press any key to perform MOK management. Press any key (press ‘e” if you don’t have ideas), then select “Enroll key from disk” using your arrow keys and Enter.
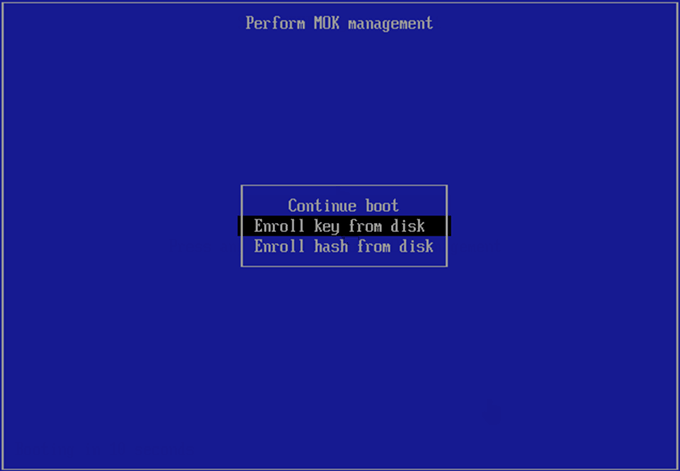
Then, you’ll be asked to find the key. It will be in “VTOYEFI” (select that with Enter), then find the key that says “ENROLL_THIS_KEY_IN_MOKMANAGER.cer” with arrow keys and Enter. Then click “Continue”, then click “Yes”.
|
|
|
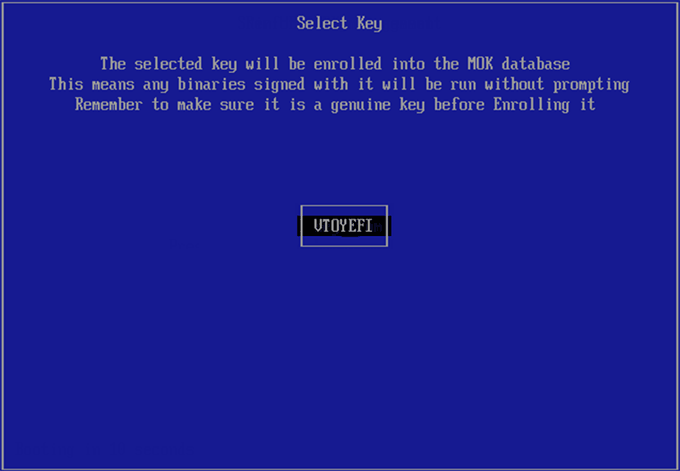
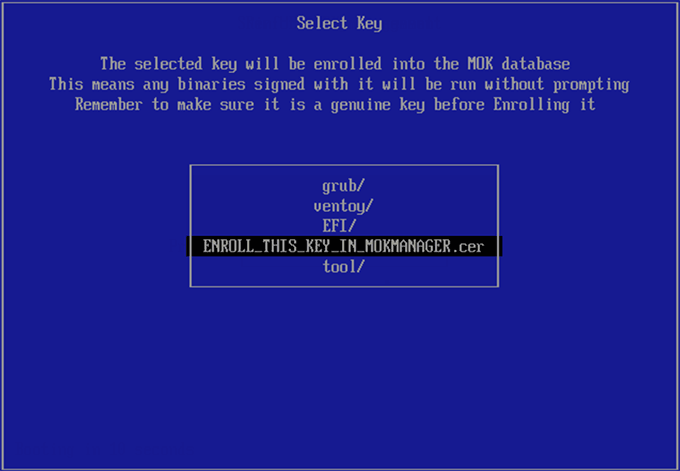
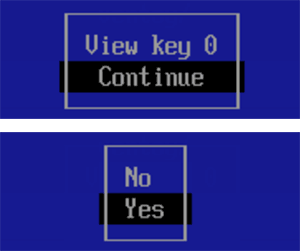
Finally, you’ll be back to the previous screen, click “Reboot”. This should now boot back in.
9. Explore the Live System
Note: The following screenshots are of Fedora KDE.
Welcome to the Fedora KDE Live System! This is what you should be seeing.
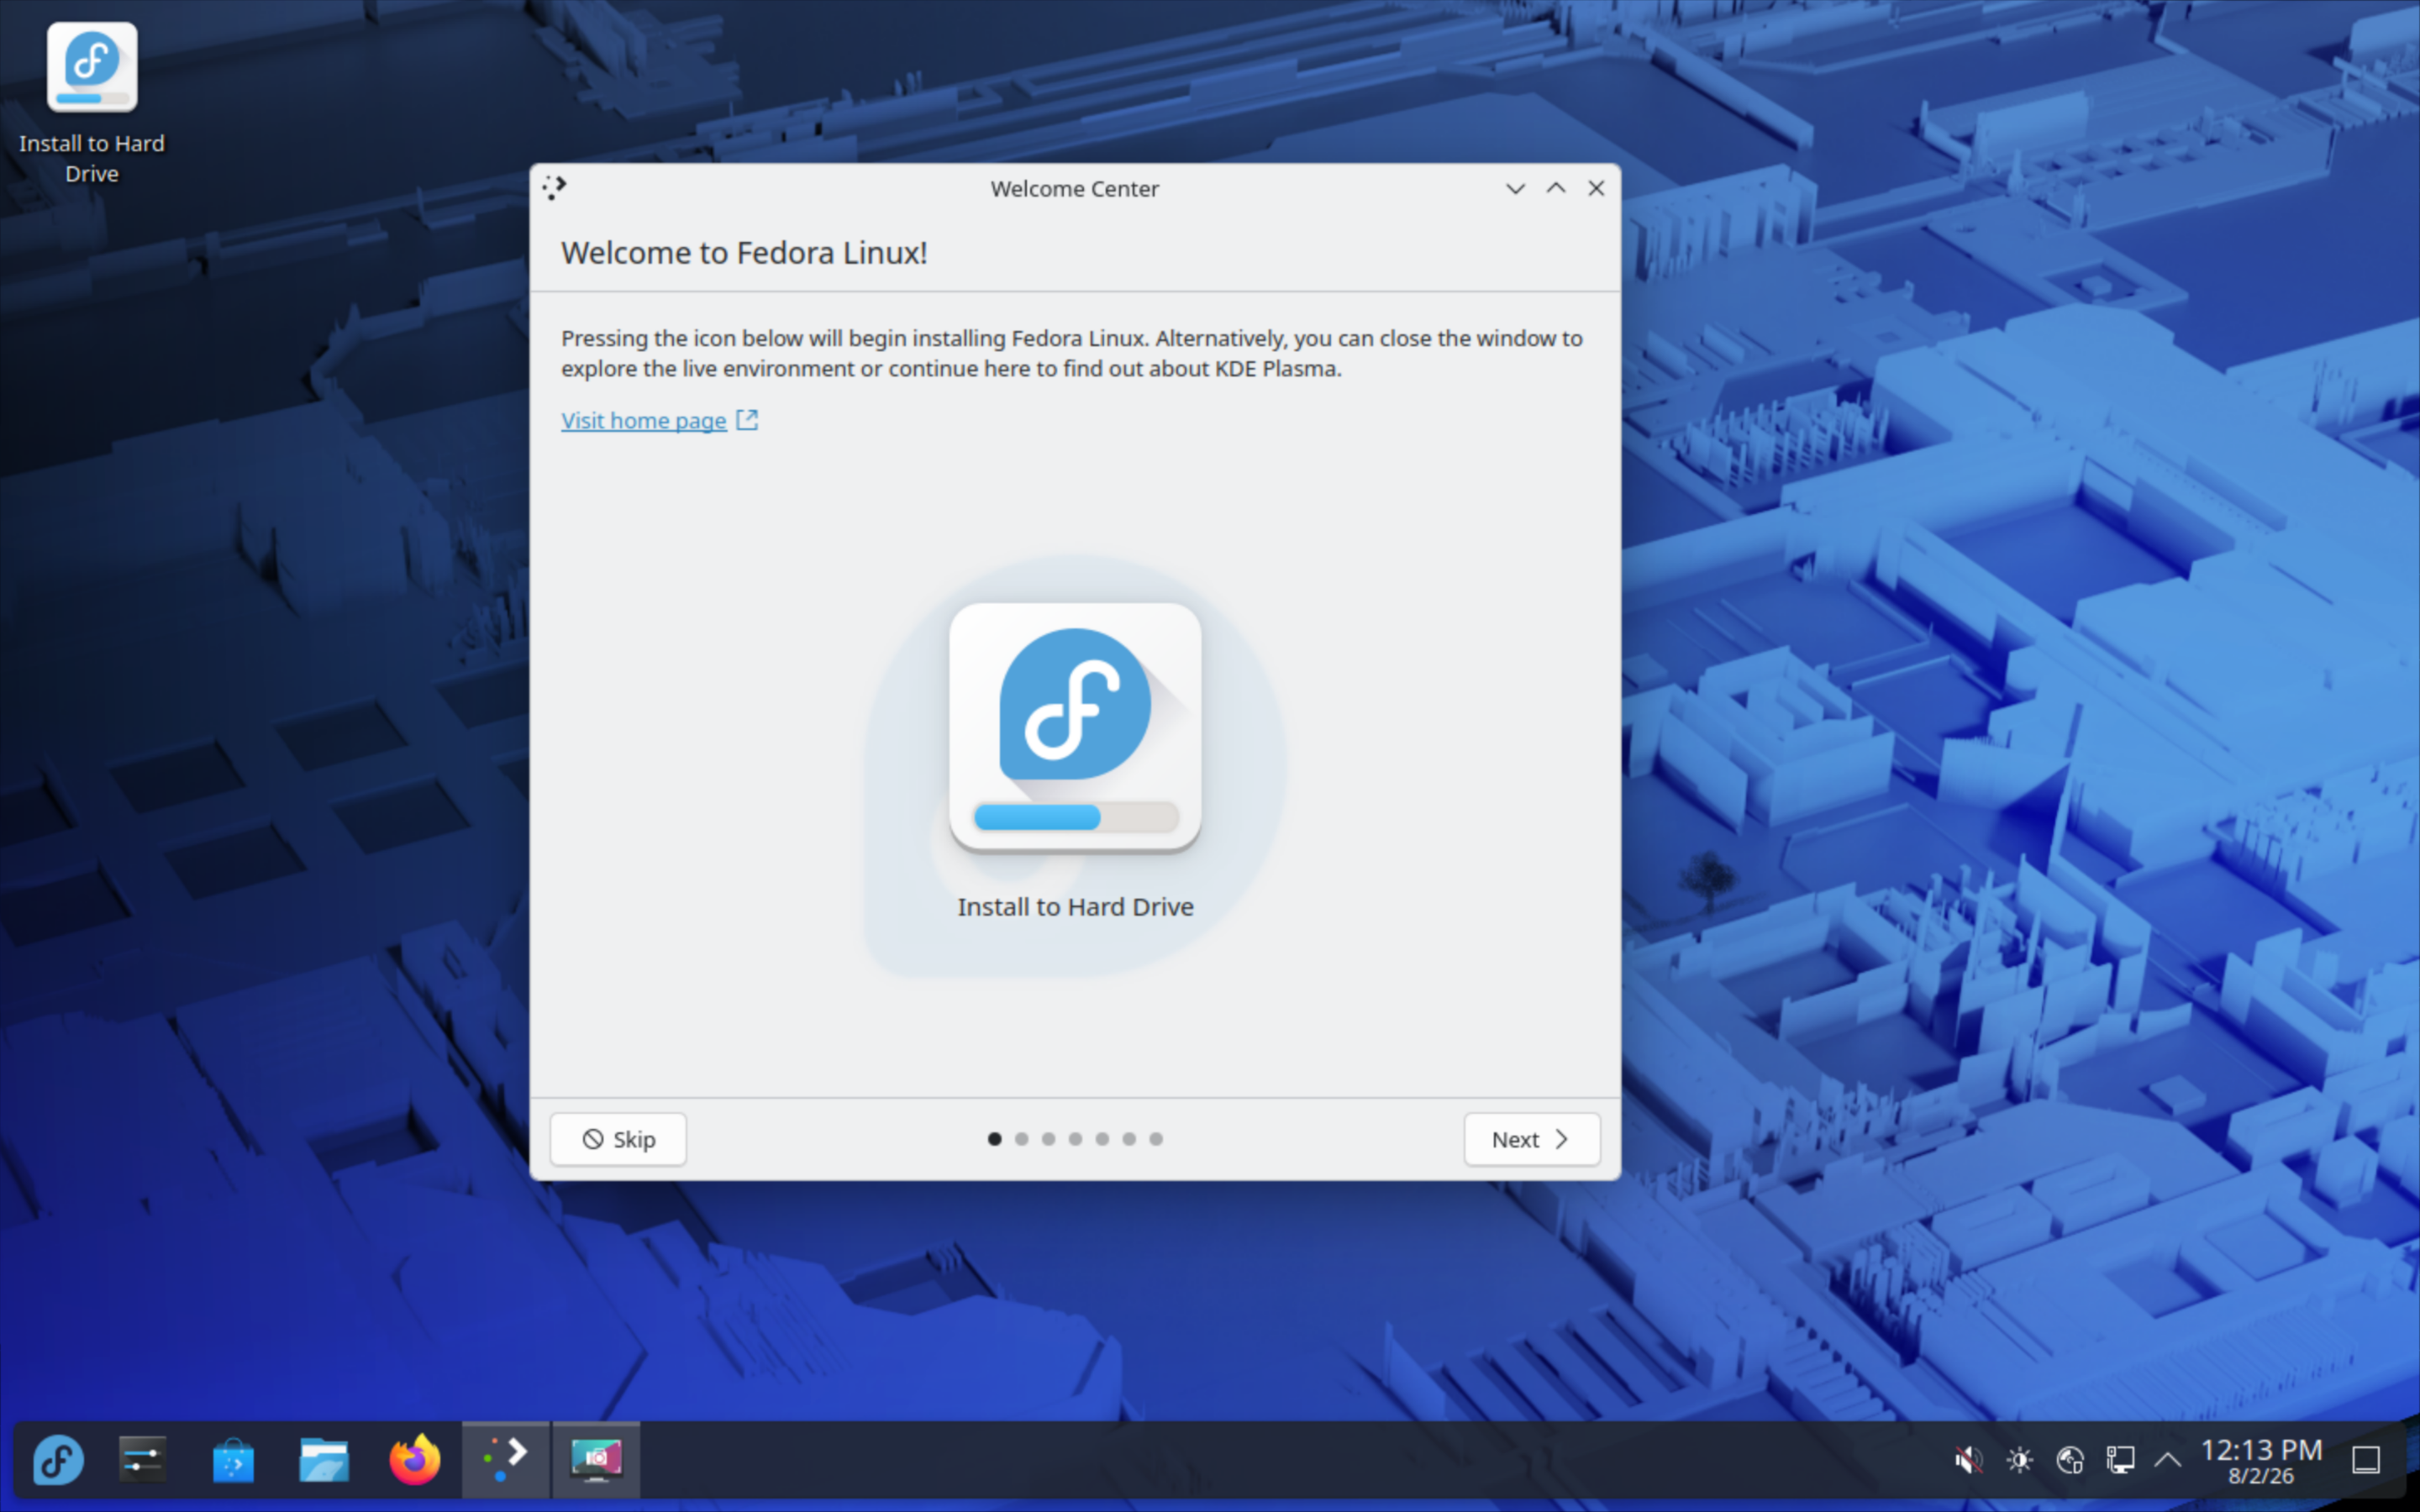
Please note that the version of KDE Plasma which is installed on the pendrive is older than the version that’ll be installed once you install Fedora. Expect some visual differences.
You can now look around the environment, see what apps are present, see how KDE works, and explore as much as you wish! Do remember that whatever files you create, apps you install, or settings you modify will be lost on the next reboot.
Also do remember that any changes you make to other drives on your computer (such as the one with Windows) in the live system WILL persist, so don’t go deleting System32 thinking it’ll magically revert back!
The Welcome application that opens up when you start the distro is quite helpful. Please take a look at what it says. If you missed it, it can be opened by opening the “Welcome Center” application from the “Start Menu“-like equivalent (called Application Launcher on KDE).
Once you’re done exploring, open the Fedora Installer application (called Install to Hard Drive) by clicking the shortcut on the Desktop, or from the Start Menu, or in the Welcome Center (pictured above).
This will open the Fedora installer in full-screen.
10. Install Fedora
Welcome to the Fedora Installer!
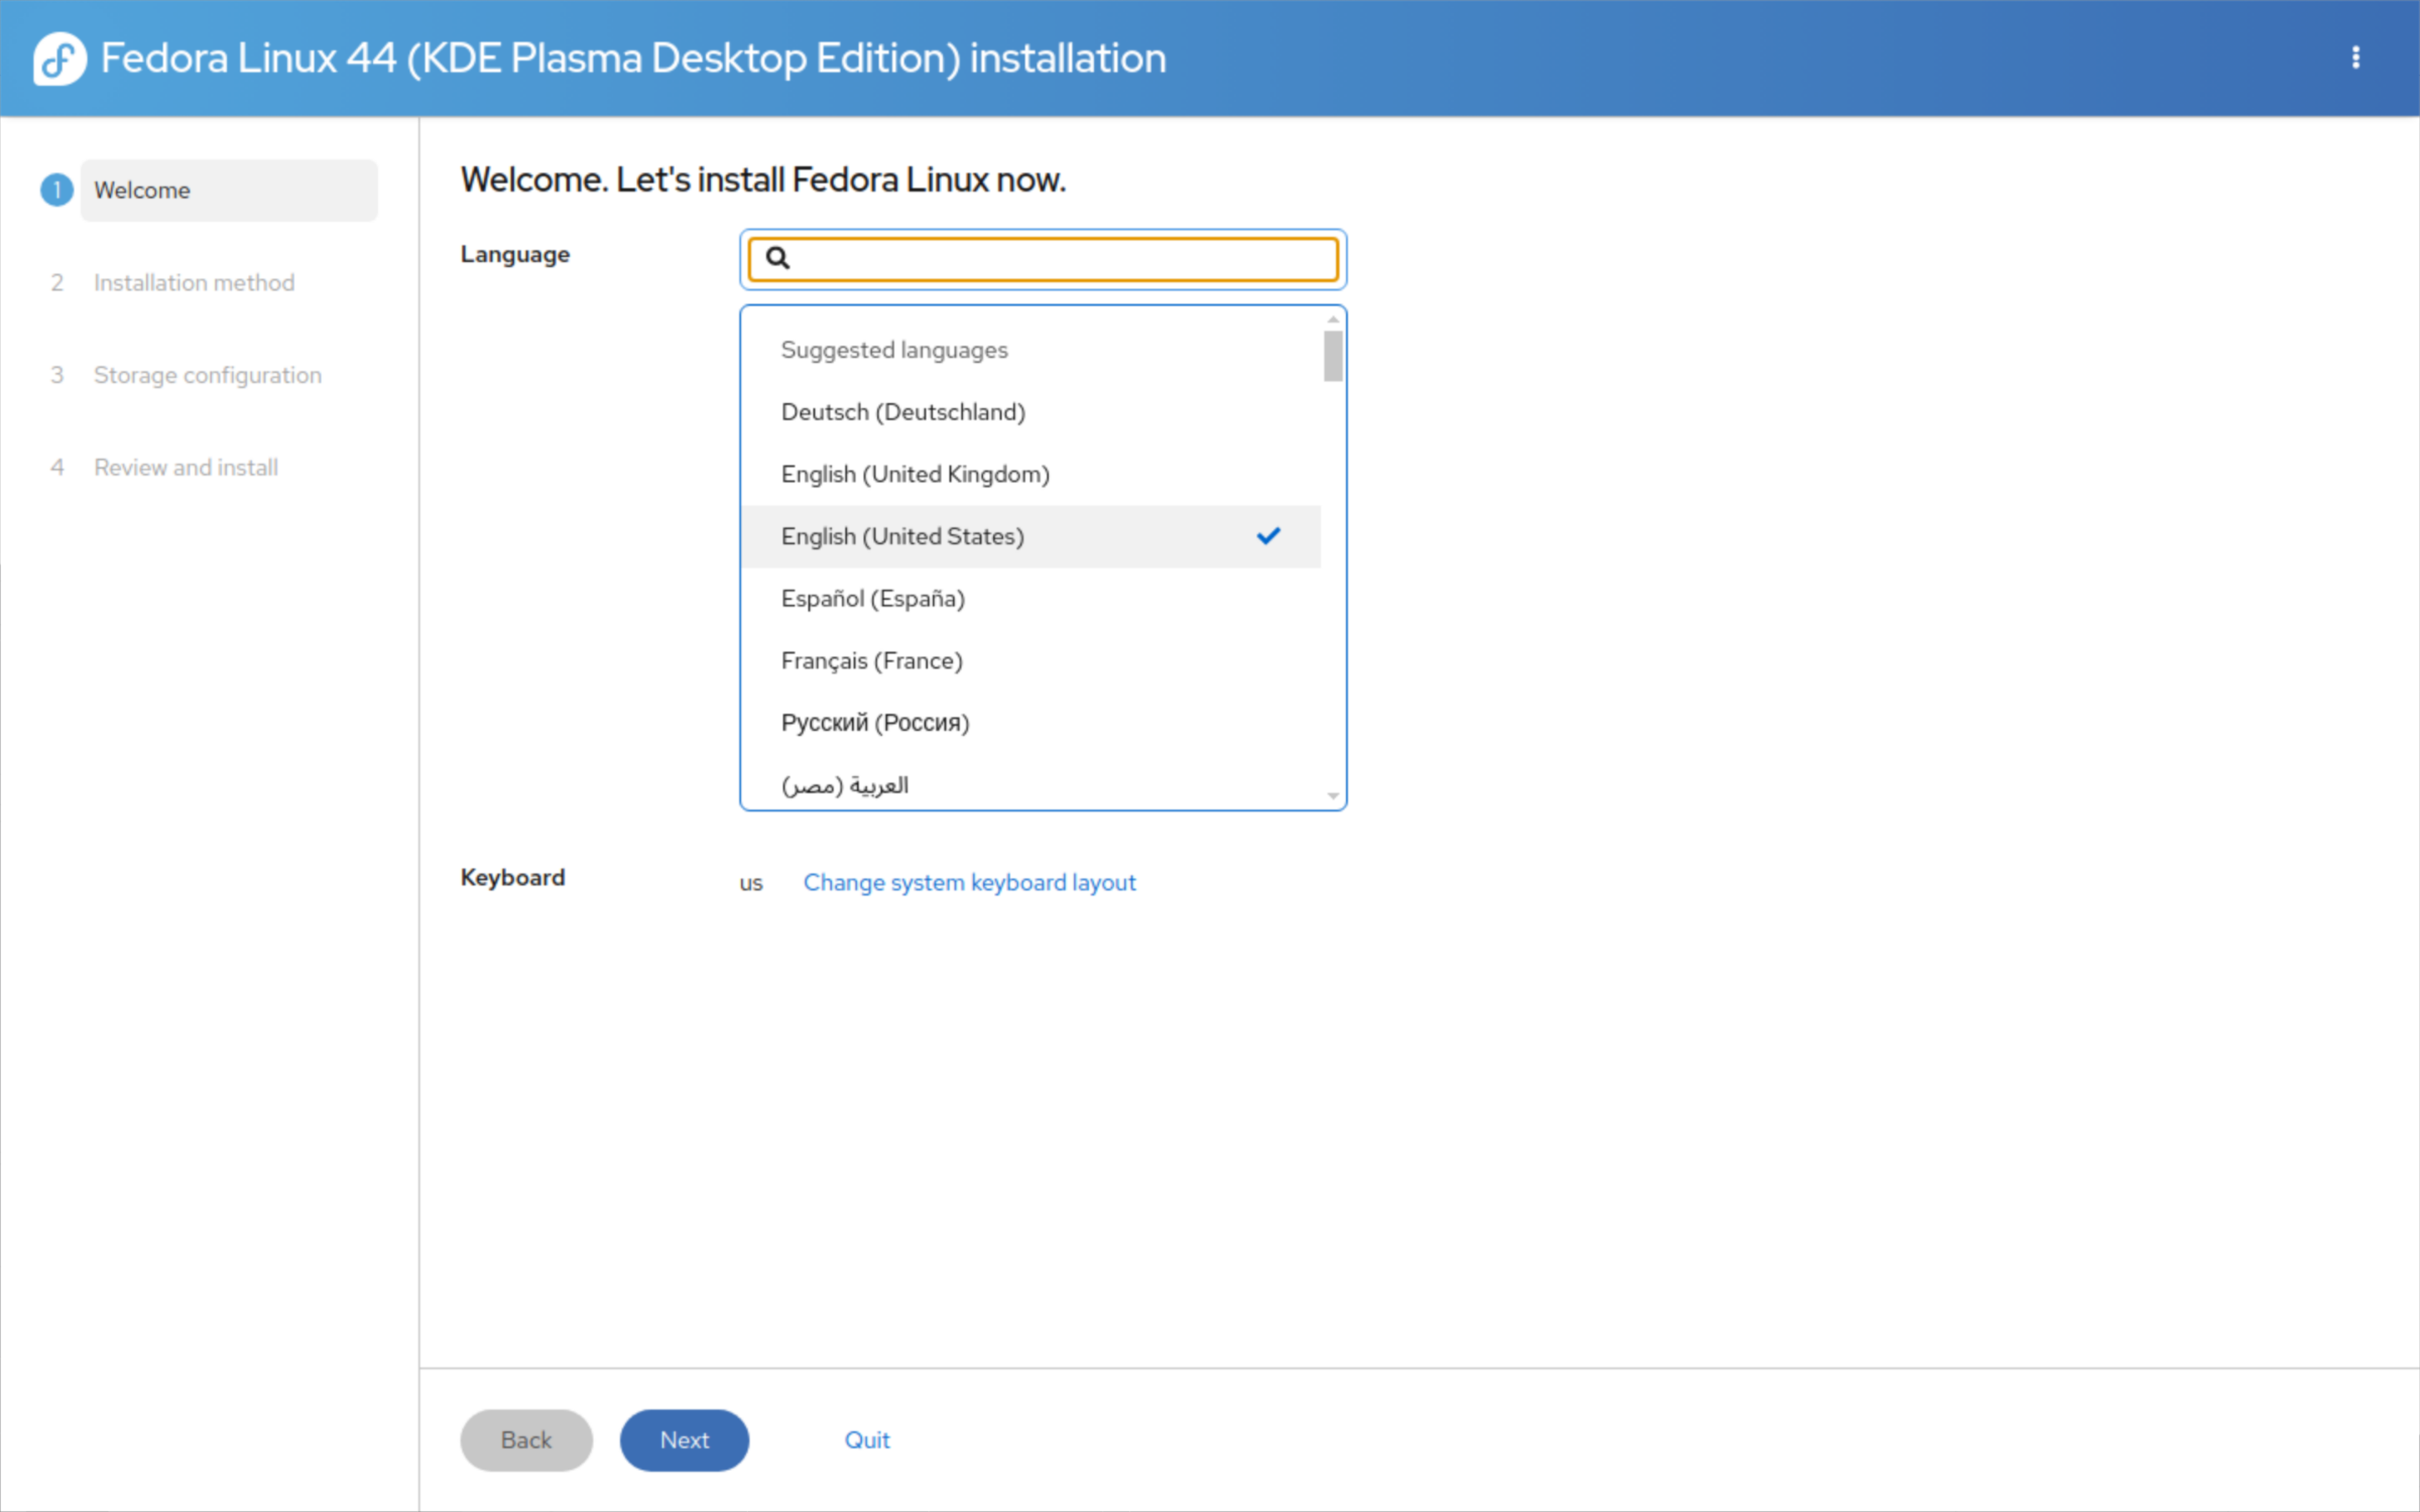
Choose your desired language and keyboard layout, and click next. If
you bought this laptop in India (or the US, for that matter), you’ll
have a regular us layout. If not, you should choose your
keyboard layout in this step (you can guess your layout based on where
you bought your laptop from). Be sure to test your layout!
You should then see this screen: (note that some things, such as the drive name and size, will be different)
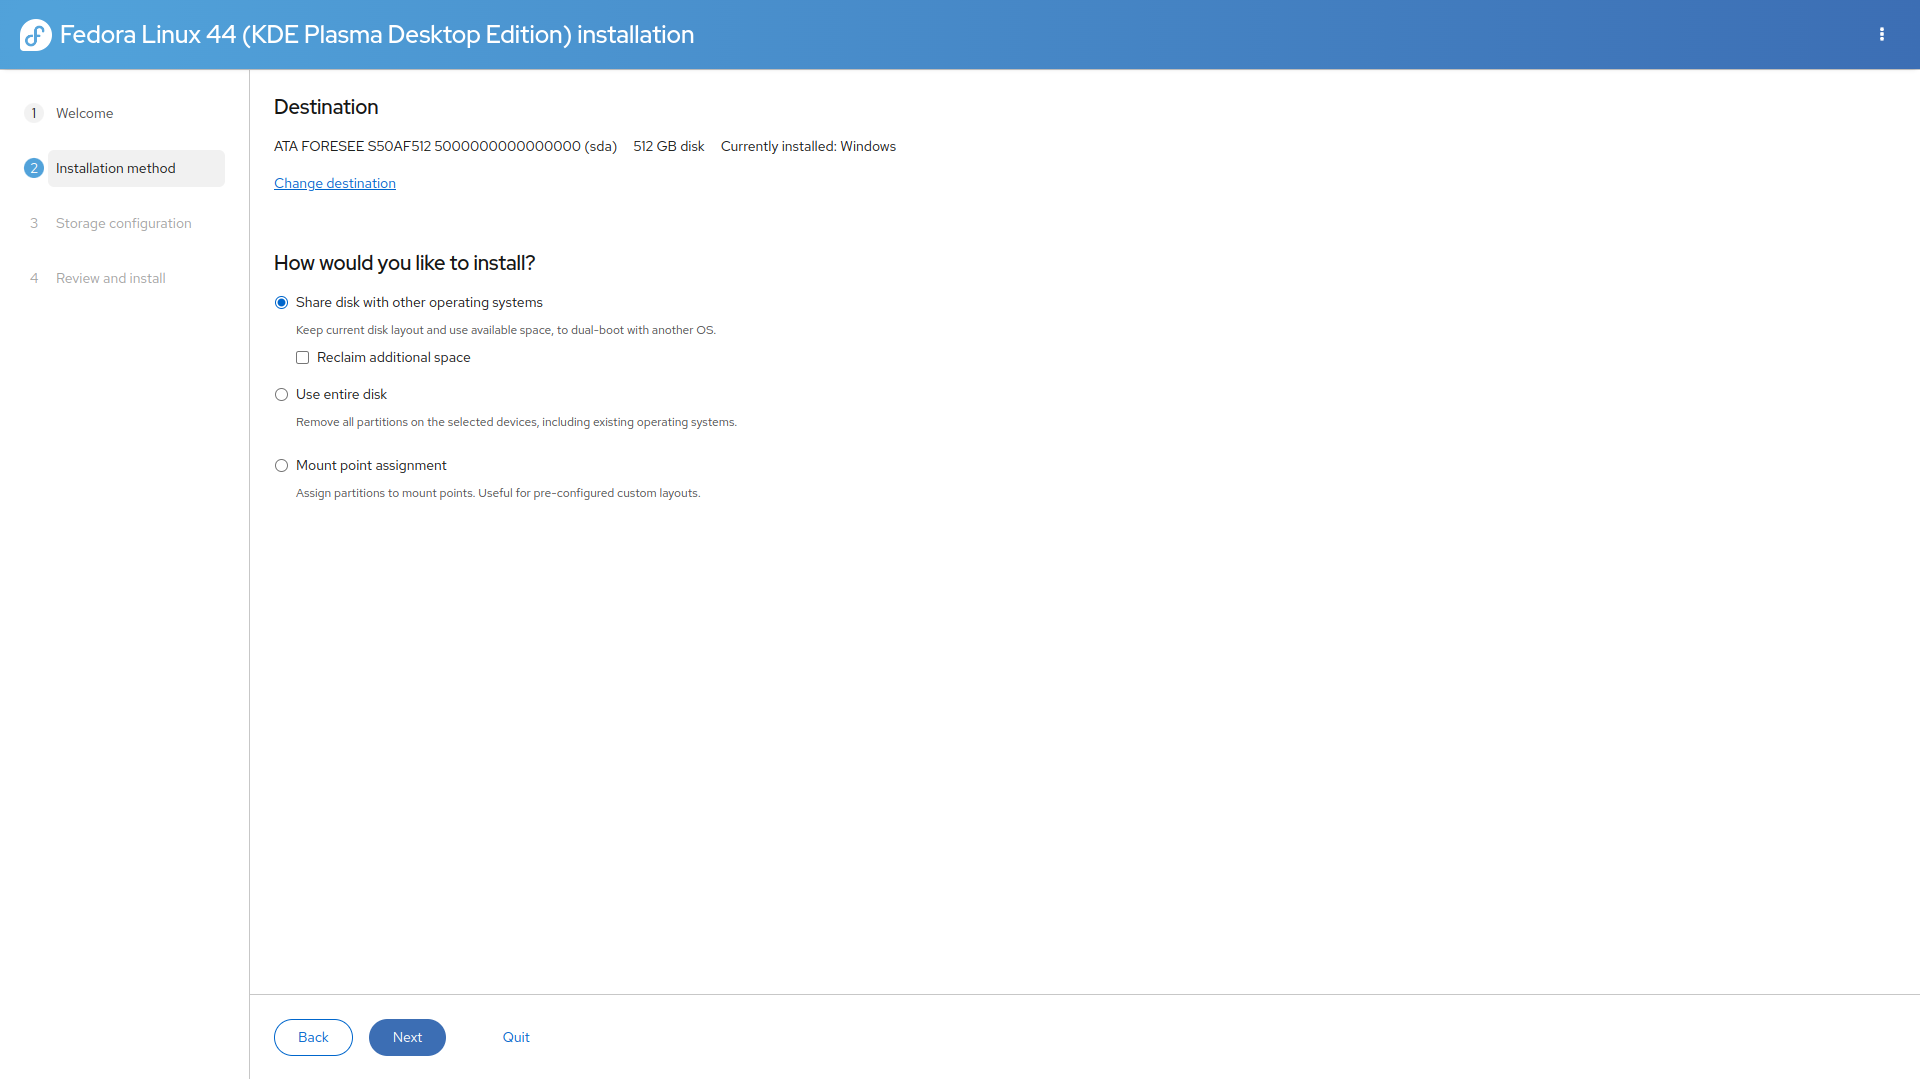
Triple-check that the correct drive has been selected. It should be your main drive with Windows on it, not a pen drive or some other storage drive. You can see the selected drive in the “Destination” section. Select the drive by clicking “Change destination”.
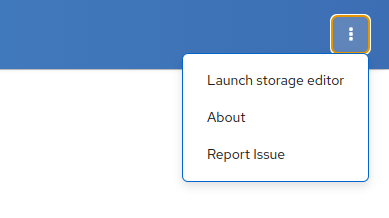
After you’ve verified that you’ve selected the correct drive, click the three dots in the top right corner, and select “Launch storage editor”.
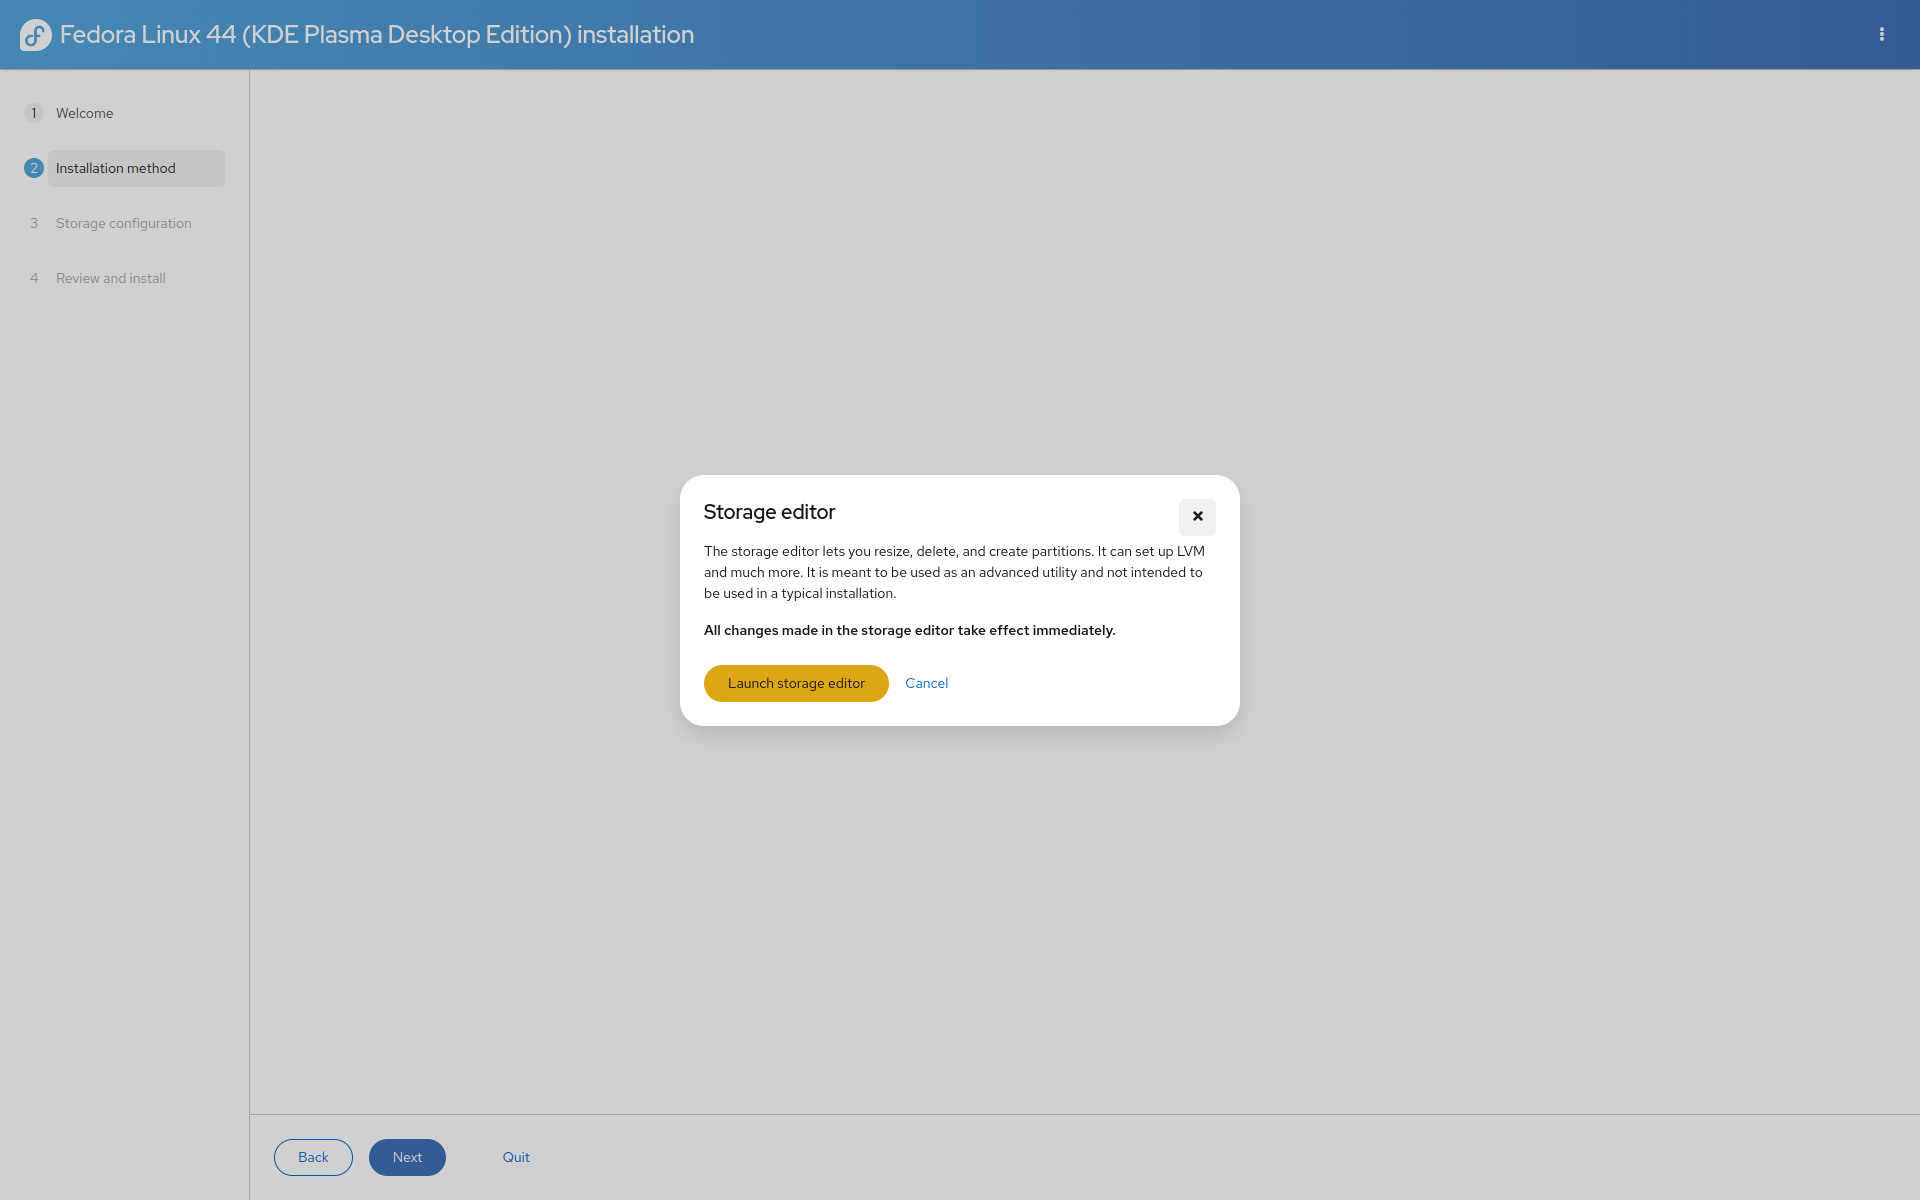
Confirm the dialog box that appears, and note the warning. You will now be changing your disk partition layout. Deleting or updating the wrong partition can lead to Windows being broken or a loss of data, so be very careful when you follow the following steps.
You will see a list of partitions (with names like /dev/nvme0nXpY or /dev/sdXY) which already exist on your drive and were put there when Windows was installed. You should also see a partition named Free Space with the size you set in Device Management back in Windows. Note that there may be more than one “Free Space” entry! You can identify the correct one based on its size. Note that the Fedora installer reports sizes in gigabytes (GB) while Windows reports sizes in gibibytes (GiB), while still calling it GB, so you will see that the size in the installer will be a little more (60 “GB” on Windows would be around 62 GB on the installer).
Once you’ve found the free space entry, you will now need to create
partitions. We need to create three partitions. One for
installing the actual bootloader file (called esp), one for
keeping bootloader data (called boot), and one for keeping
all other data. You can create partitions from the menu opened by
clicking the three dots next to the free space entry.
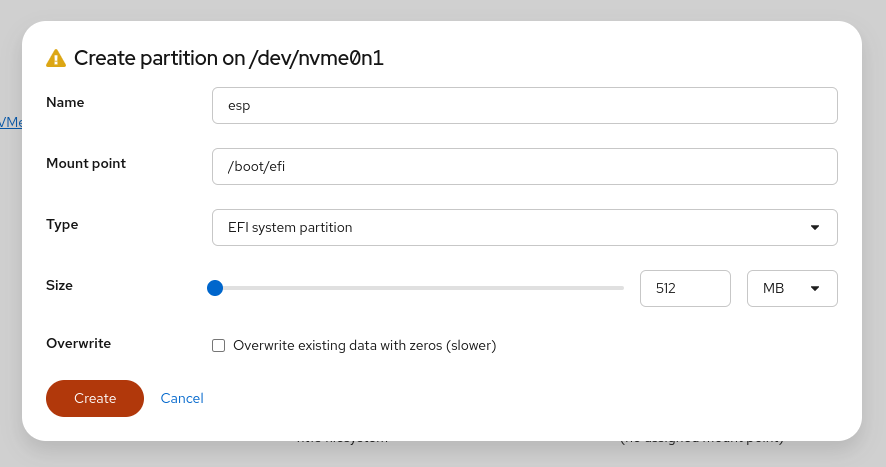
First, let’s create esp. It should be
549.7558 MB (which is 512 MiB, NOTE THAT THE
BELOW IMAGE HAS THE WRONG NUMBER, you should use this one), mounted to
/boot/efi, and the type should be EFI system partition.
Remember that when you click “Create”, it will get created immediately
without confirmation (but it can be deleted if you made a mistake), so
make sure you’ve configured the partition properly as shown below.
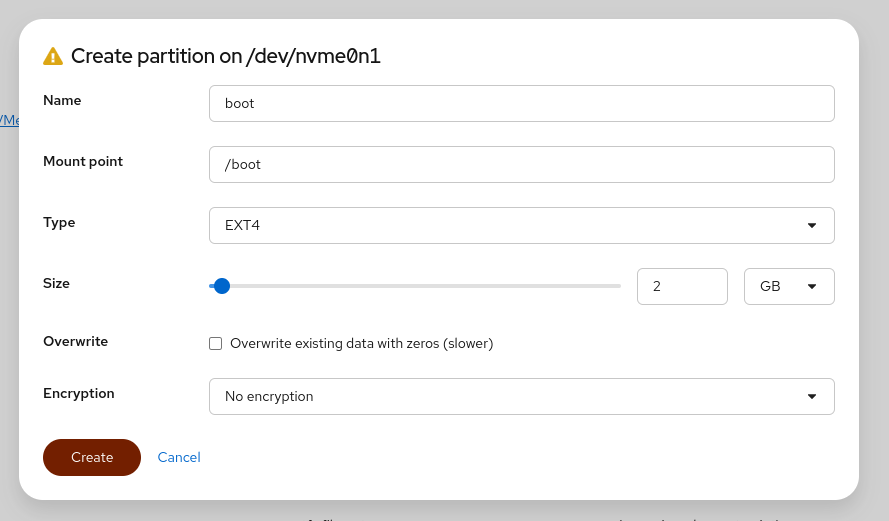
Next, create boot. It should be 2.147484 GB
(which is 2 GiB, NOTE THAT THE BELOW IMAGE HAS THE WRONG
NUMBER, you should use this one), mounted to /boot, and the
type should be ext4.
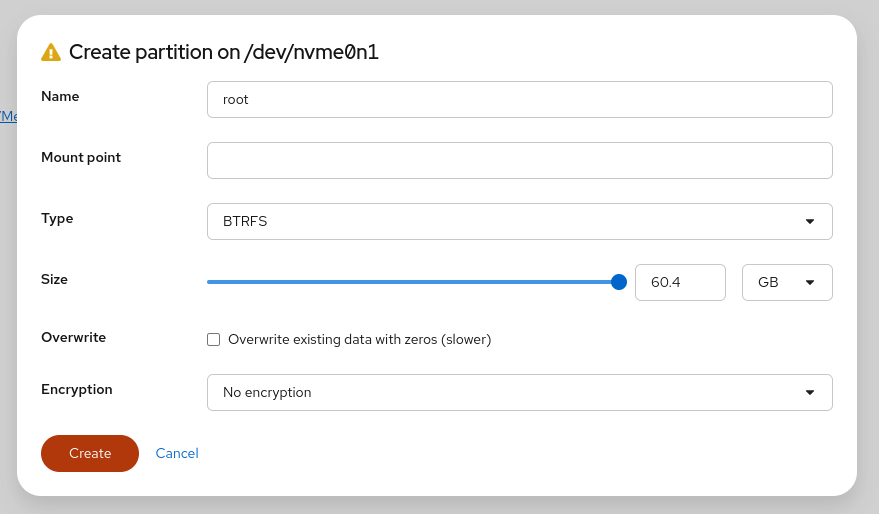
Next, create data or root (name doesn’t
really matter). It should be the rest of the available free space (60.2
GB in my case, but it may be different for you), NOT mounted anywhere
(the field should be blank), and the type should be
btrfs.
The final partition you created will house all your data. Now you
must create two subvolumes – one to store operating system data (called
root), and one to store your user data (called
home).
Click the three-dots next to the entry that says “top-level” under the entry of the final partition you created, then click Create Subvolume.
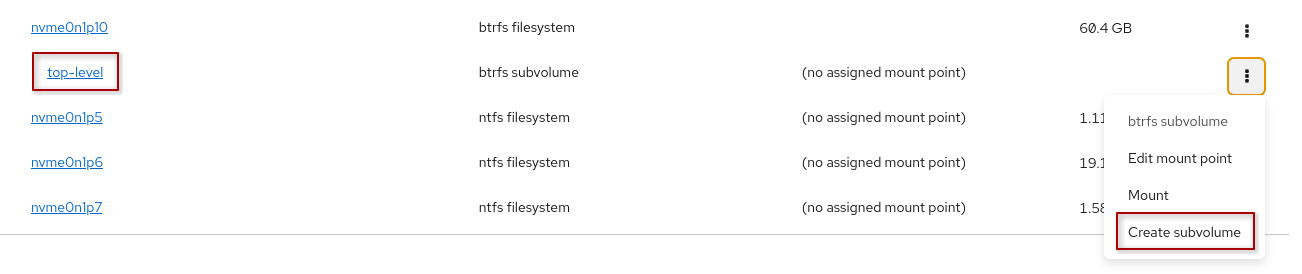
Create the root subvolume and mount it at
/.
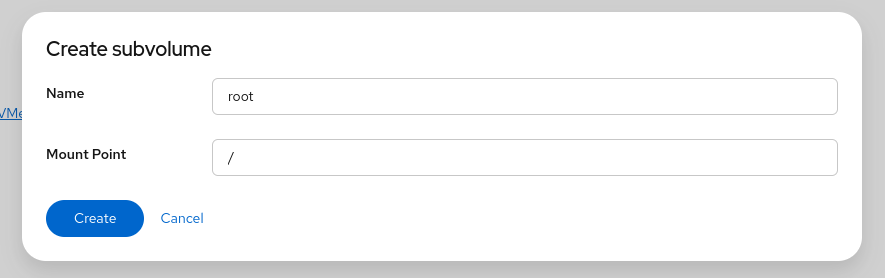
Then, create the home subvolume and mount it at
/home.
Once you’ve followed all these steps, you can exit the storage editor. If you see a warning such as below, it’s fine, it’s a bug with the installer, it can be ignored.
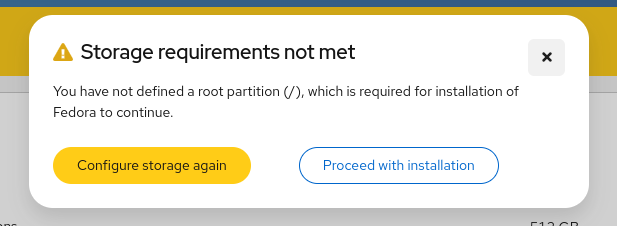
If you didn’t get the storage requirements not met warning, then you should see a “continue with installation” dialog. You can click continue on that dialog, and you should be on the page that lists what changes will be made to what drives. Skip to [finstall].
If you did get the warning, then you need to manually assign the mountpoints, which can be done by closing the storage editor and selecting the assign mount points manually radio option and clicking next.
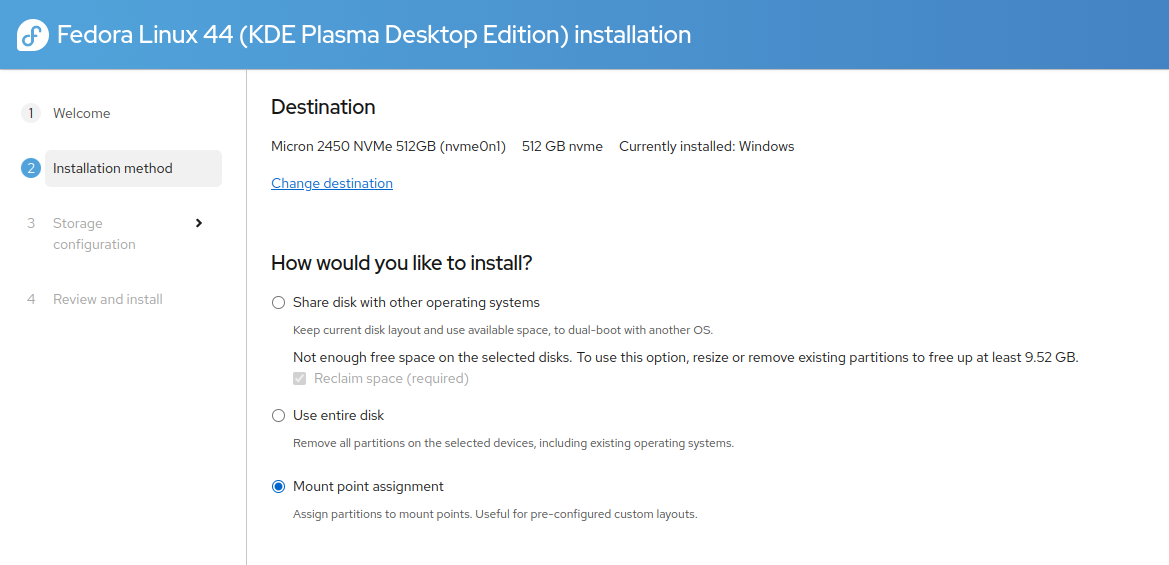
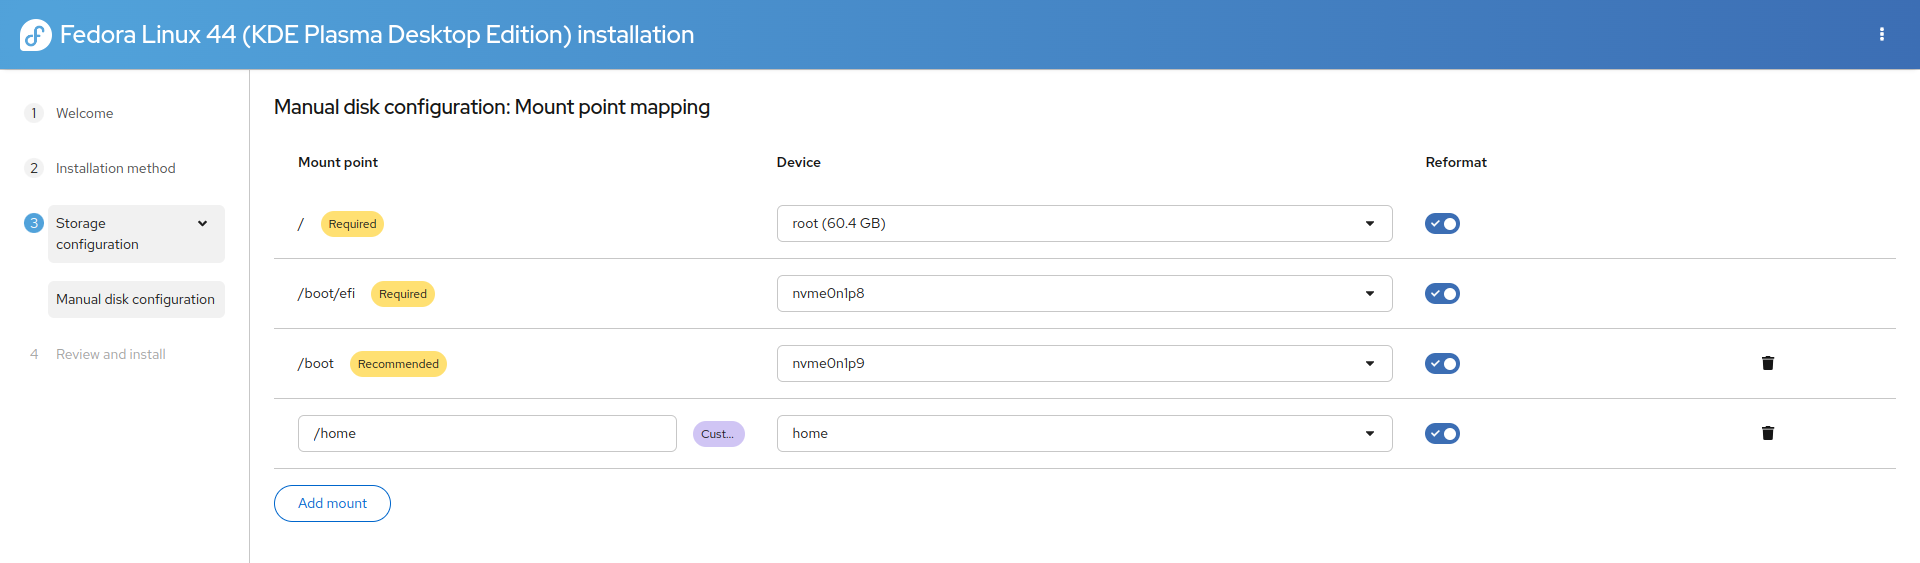
This will take you to a section to assign mount points. You just need
to assign the same mount points as earlier. Note that the
esp and boot partitions will appear as
/dev/abc files, but the subvolumes will appear as root and
home. Assign mount points as you see in the below image.
You’ll need to add an extra mount point for /home since that’s not
included in the defaults.
10.1 Finalising the installation
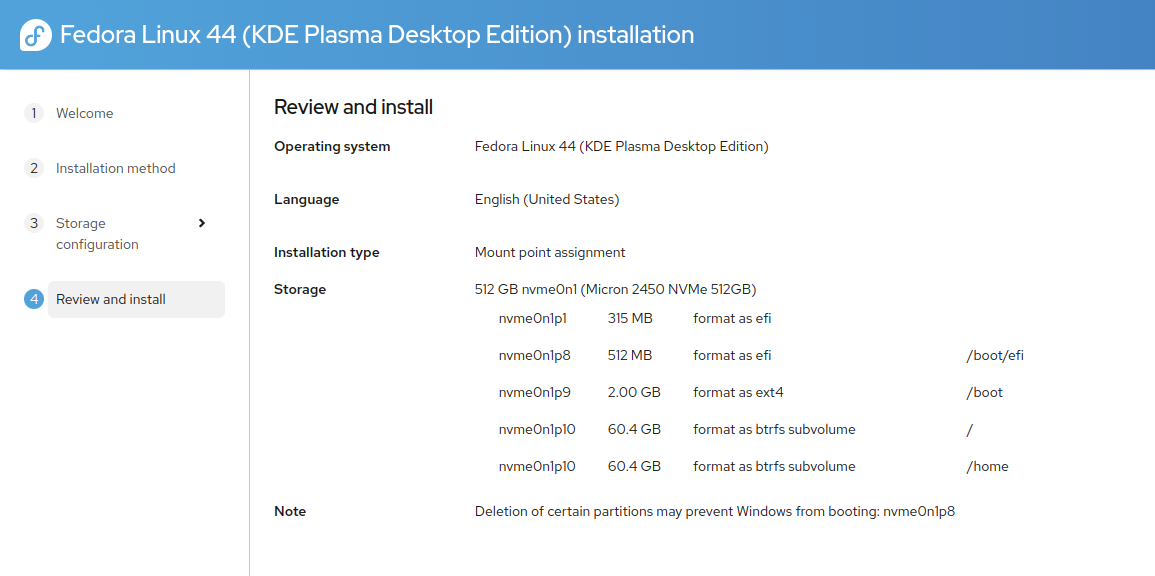
Now you should see a list of changes that will be done to your disk. What you should see is something along the following below. What you should not see is a warning about the Windows ESP partition being erased or something like that.
Basically, make sure this screen matches one-to-one (except maybe the
partition labels) to the below image. Note that the note about
nvme0n1p8 below can be ignored since Windows” ESP will be
the first partition usually, which is nvme0n1p1 or
sda1 or something of that sort. Also, the “format as efi”
line for nvme0n1p1 can be ignored, it’s another bug.
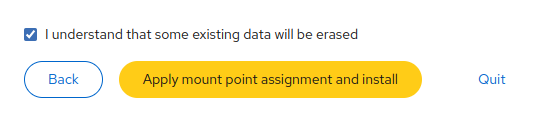
Once you’ve checked that you’ve partitioned correctly, you can begin the installation. You might have to check a box like below. Just make sure you’ve partitioned properly, you should be fine.
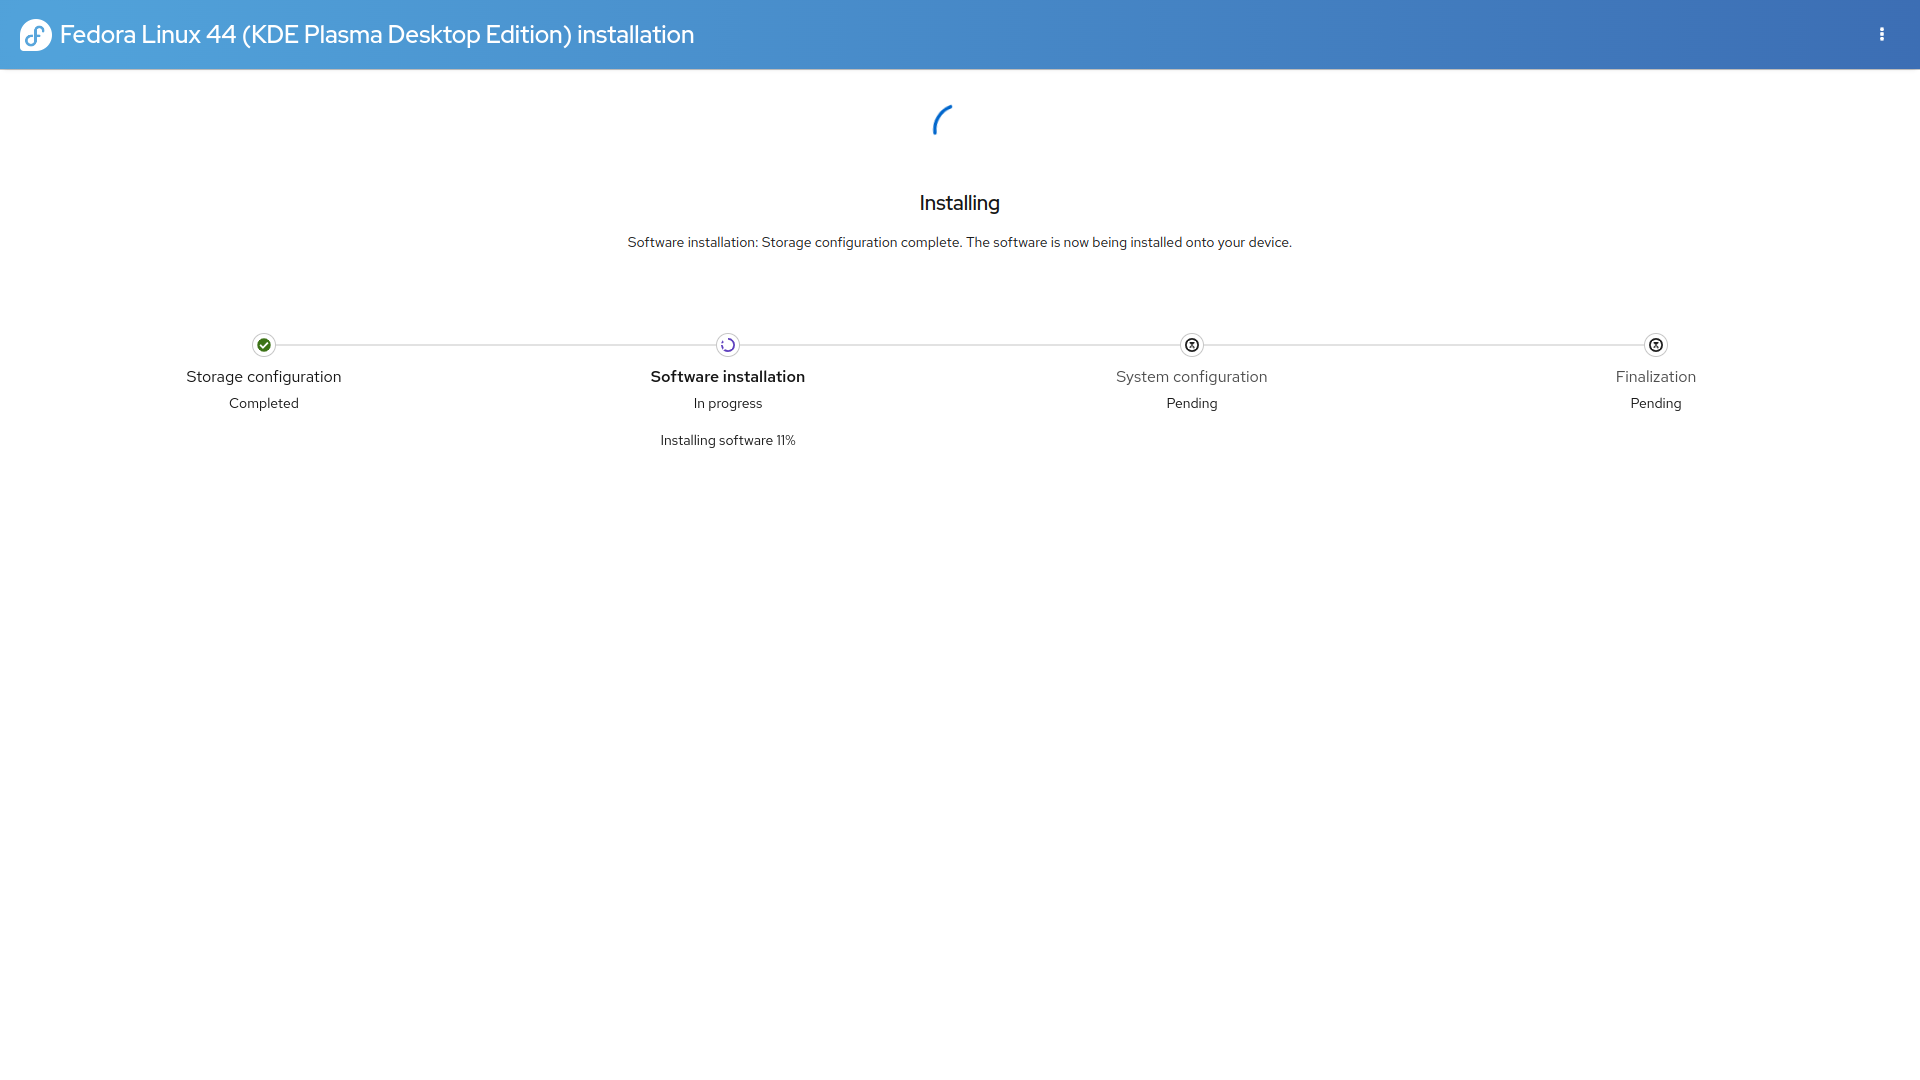
Now, the installation has started. It should take about five to ten minutes. Sit back and relax!
10.2 After installation
Once the installation completes, you will be prompted to exit the installer and return to the live system. Do so, and then reboot your computer (this can be done by pressing the restart button in the application launcher (i.e. start menu)). When your computer turns off, remove your USB stick before the computer starts up again.
You should now be booted into a GNU GRUB menu! This is a bootloader, the piece of software responsible for loading the operating system. You can pick Fedora from here, or pick windows (using your arrow keys and then enter). Congratulations, you’ve successfully dual-booted your system!
If you aren’t booted into Fedora, but into windows directly, you’ll have to open your UEFI settings and update the boot order to move the Fedora entry to the top.
There are still a few steps left to do. You still need to create a user account, set a time zone, and do a few other things. Thankfully, Fedora guides you through that with a great onboarding setup screen. You just need to follow it, it’s really self-explanatory! We hope you have fun using Fedora!
11. Configure your system
These are some things you should do after installing Fedora. Please follow this section from top-to-bottom for the best results.
At least, do not skip [updatesys] and [rpmfusion]
11.1 Connect to the Internet
You can connect to the Internet using the WiFi icon in the “System Tray”, i.e. on the right side of the panel (taskbar). Choose the WiFi network you wish to connect to and enter its credentials to connect.
Please look at the next section for instructions to connect to the IIIT WiFi/LAN/VPN.
11.1.1 [Alternative 1
] Connect to IIIT WiFi
If you connected to IIIT WiFi during the setup process, you do not need to do this again.
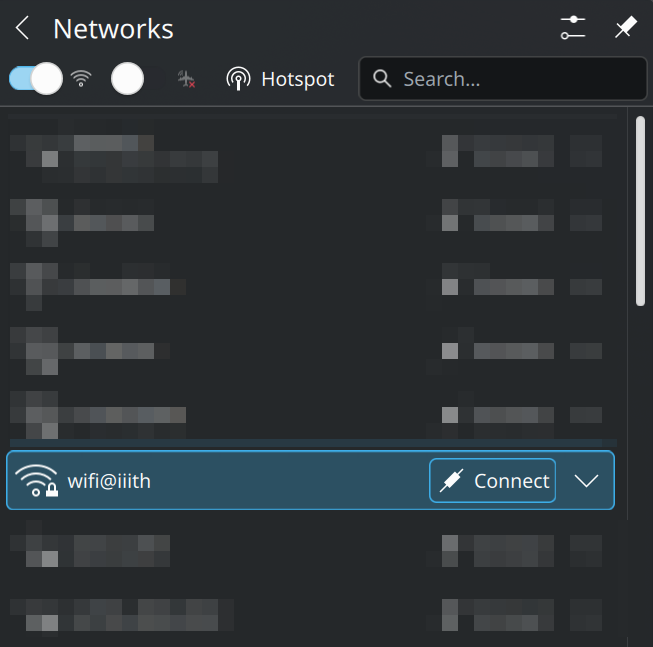
Click on the WiFi button in the System Tray (present in the bottom-right of the panel/taskbar). This opens the Network Applet.
Click the Connect button next to the
wifi@iiithlisting
In the window that appears, enter your email and 802.1x password in the WiFi security tab. Make sure the other fields are left blank as shown.
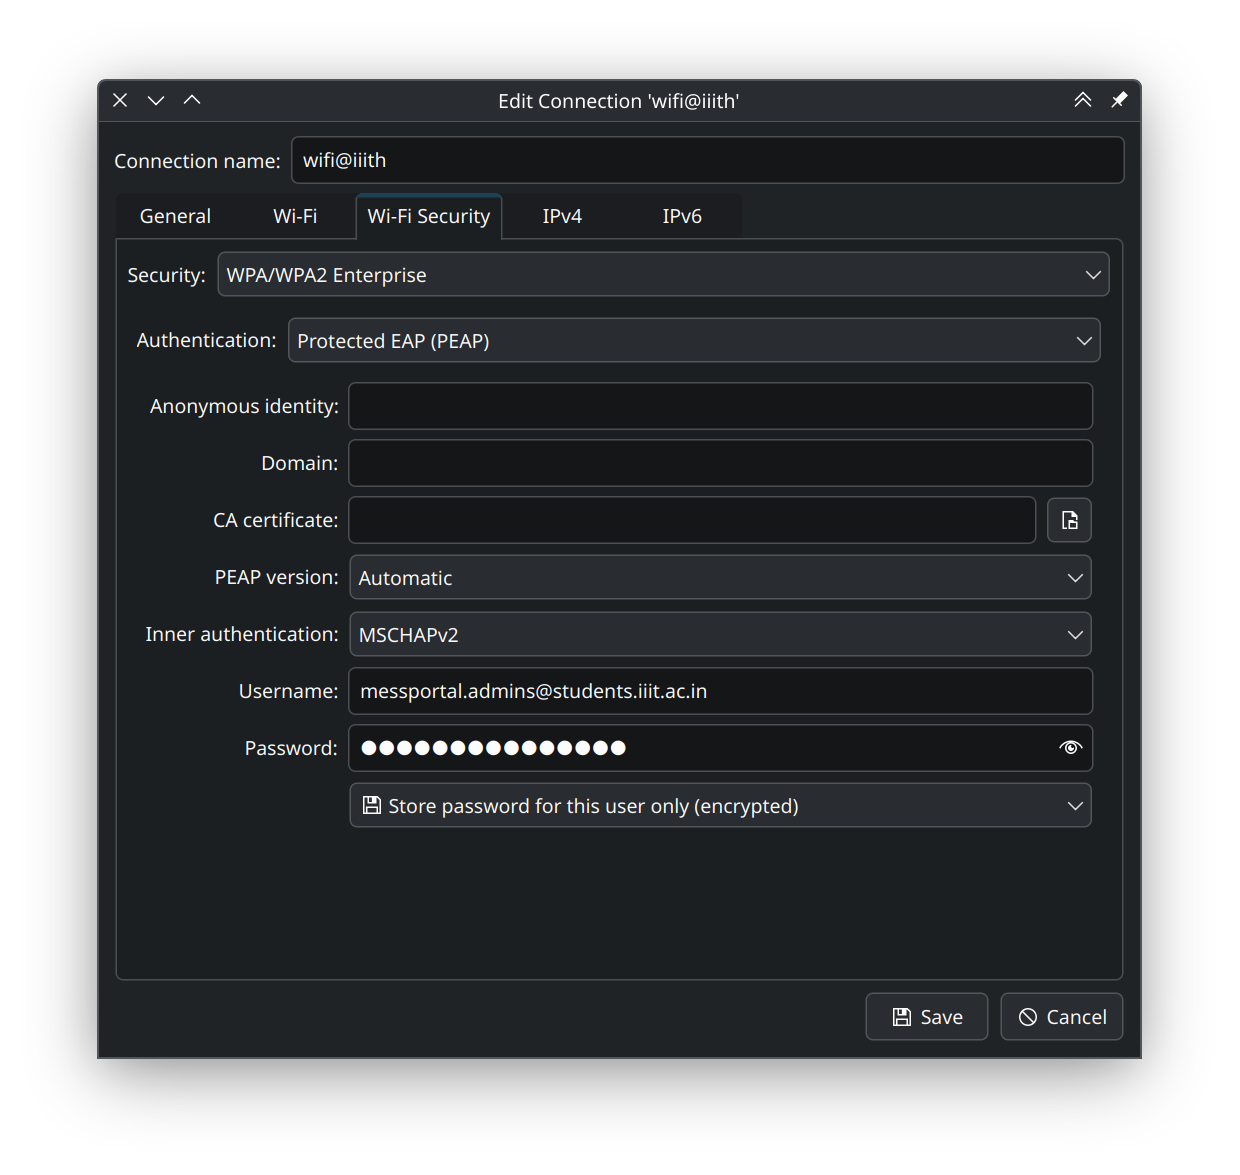
Please enter your credentials in the inputs, don’t blindly
copy!
Click the Save button and you should now be connected!
11.1.2 [Alternative 2
] Connect to IIIT LAN
Plug in your LAN Cable.
Open the System Settings application and go to the WiFi & Networking subsection in the WiFi & Internet section present in the Networking category.
Select the “Wired Connection 1” connection.
Go to the “802.1x Security” tab and enter your email and 802.1x password. Leave the other fields as shown.
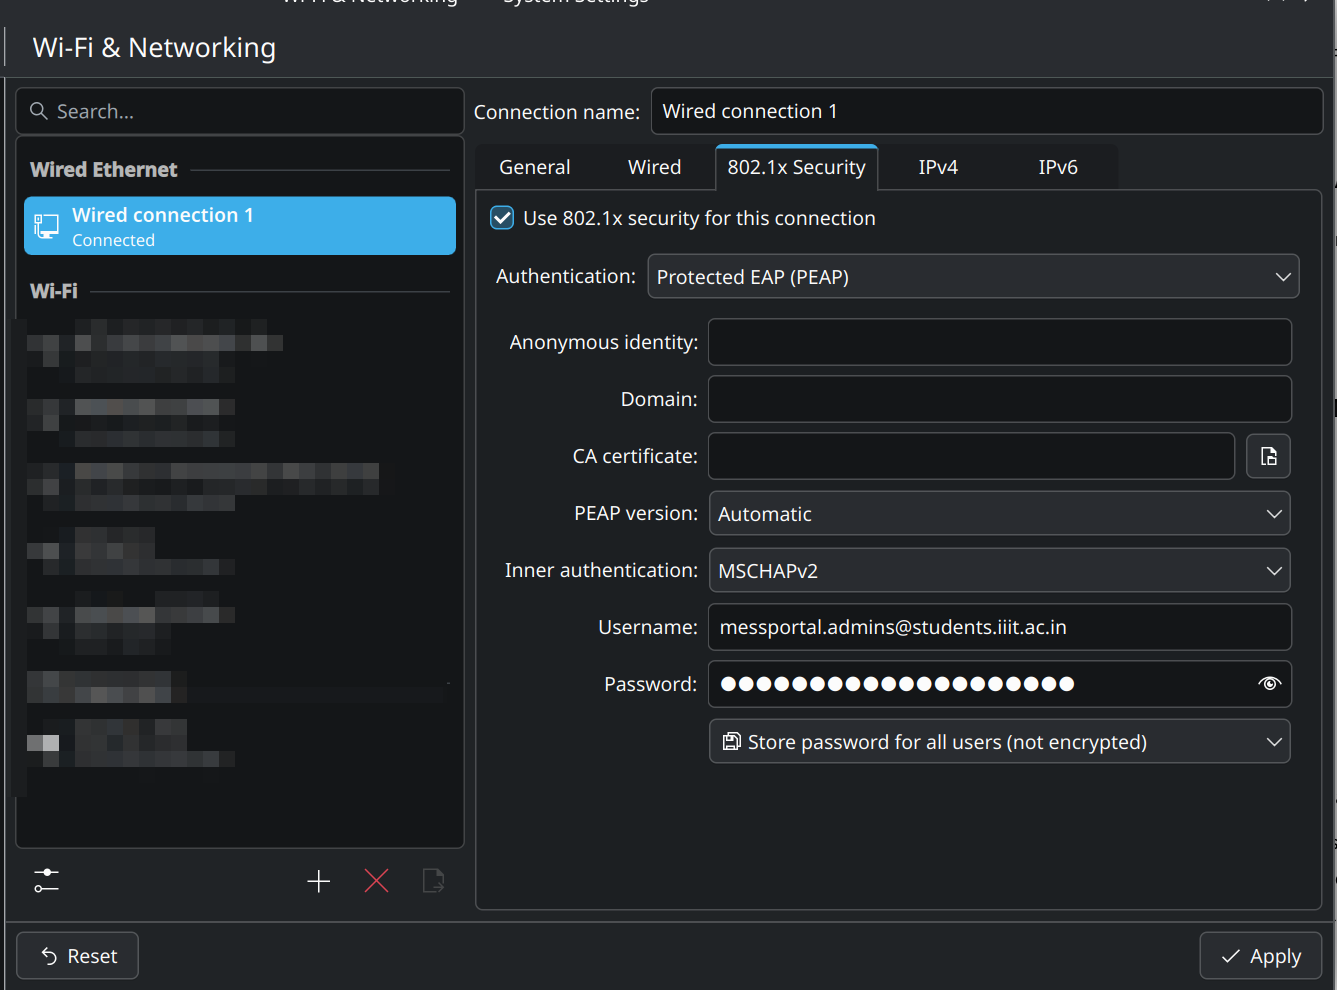
Click the Apply button. You may need to re-plug your LAN cable. You should now be connected!
11.1.3 [Alternative 3
] Connect to IIIT VPN
Go to https://vpn.iiit.ac.in and download the ovpn file for Ubuntu and Debian. It will be named
ubuntu_new.ovpn.Open the System Settings application and go to the WiFi & Networking subsection in the WiFi & Internet section present in the Networking category.
Click the Plus (+) button to create a new connection.
Scroll to the bottom and choose “Import VPN Connection…” in the window that appears.
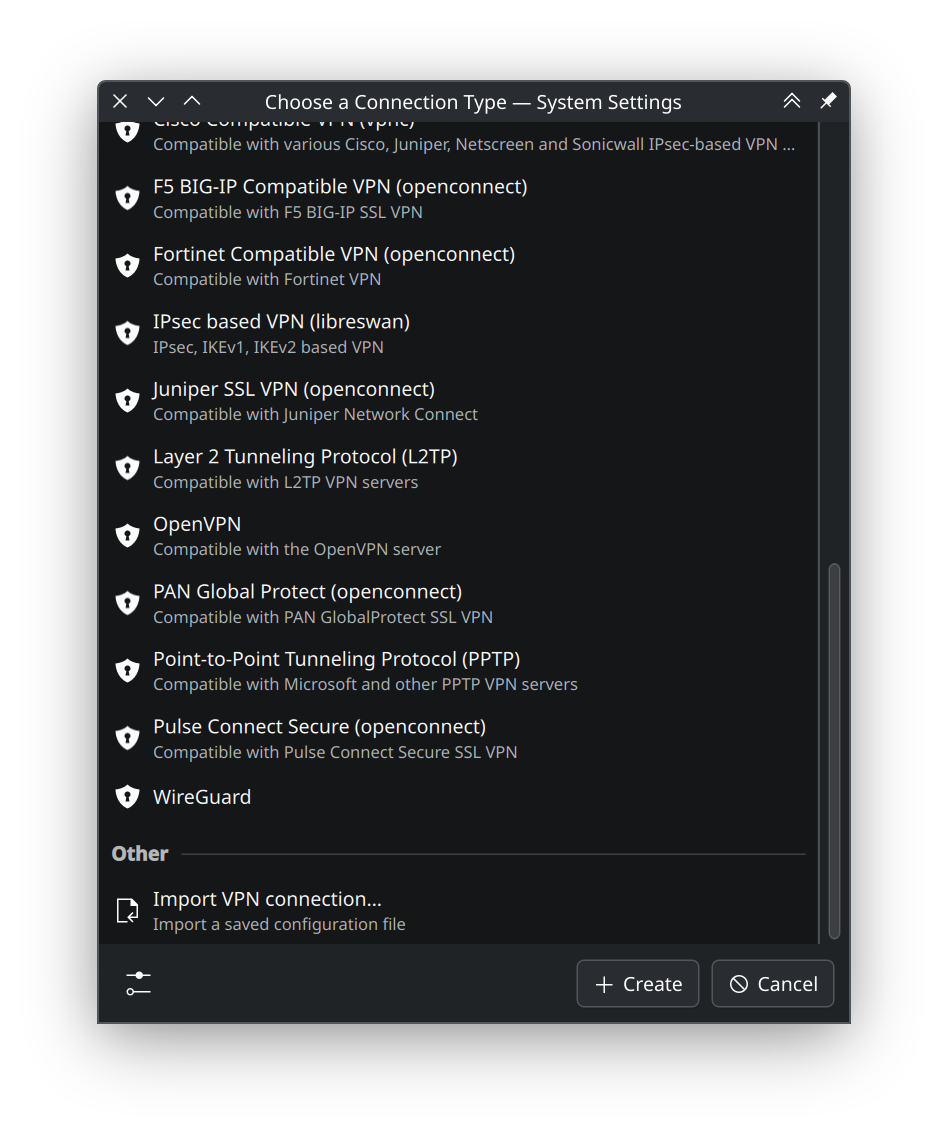
Enter your IIIT email as the username and LDAP password in the inputs as shown. Leave the other fields as shown. Rename the connection if you wish (I’ve called it “IIIT VPN”).
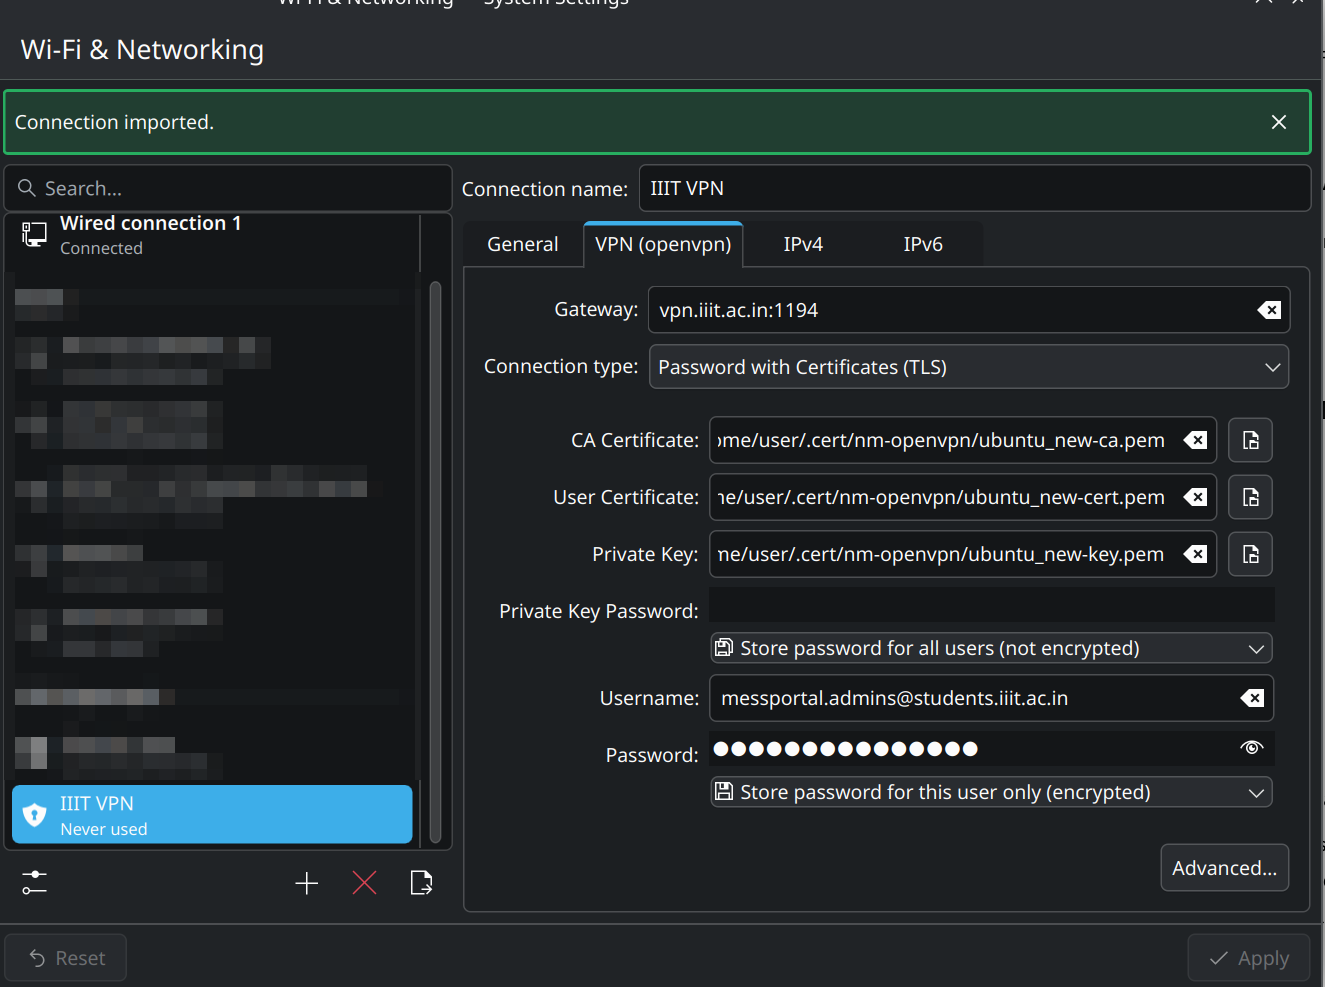
Click apply. The new VPN connection will be visible with a shield icon. Click “Connect” to connect to it.
Please note that the VPN will not work on IIIT WiFi or LAN. You must be connected to a network not managed by IIIT to use the VPN.
11.2 Update your system
The Fedora installer copies files from the live system, and live system ISOs are not refreshed with new versions of packages, so you have to manually update your system to get the latest versions of installed packages and applications.
This is kind of similar to performing a Windows update.
You may follow any one of the two methods listed below.
11.2.1 [Alternative 1
] Using the Terminal
Fedora uses the dnf package manager to install
packages.
To update your system, run the following command in the Konsole application, KDE’s terminal.
sudo dnf upgrade --refreshYou’ll be asked for confirmation. Press “Y” and then enter to confirm the update. If you are asked to import GPG keys, please press “Y” and then enter to do so. You should restart your computer after updating.
11.2.2 [Alternative 2
] Using the Discover Store
Open the “Discover” application from the Application launcher. Discover is KDE’s app store. You install most applications from here. Unlike the Windows and Mac stores, Discover contains many more packages and applications, and does not need an account to use.
Go to the Updates section in Discover and click the “Update” button.
You may have to enter your password. After the updates are downloaded, you may have to restart your computer. These restarts are only required if critical components like the kernel and bootloader are updated. For regular app updates, there is no need for a restart.
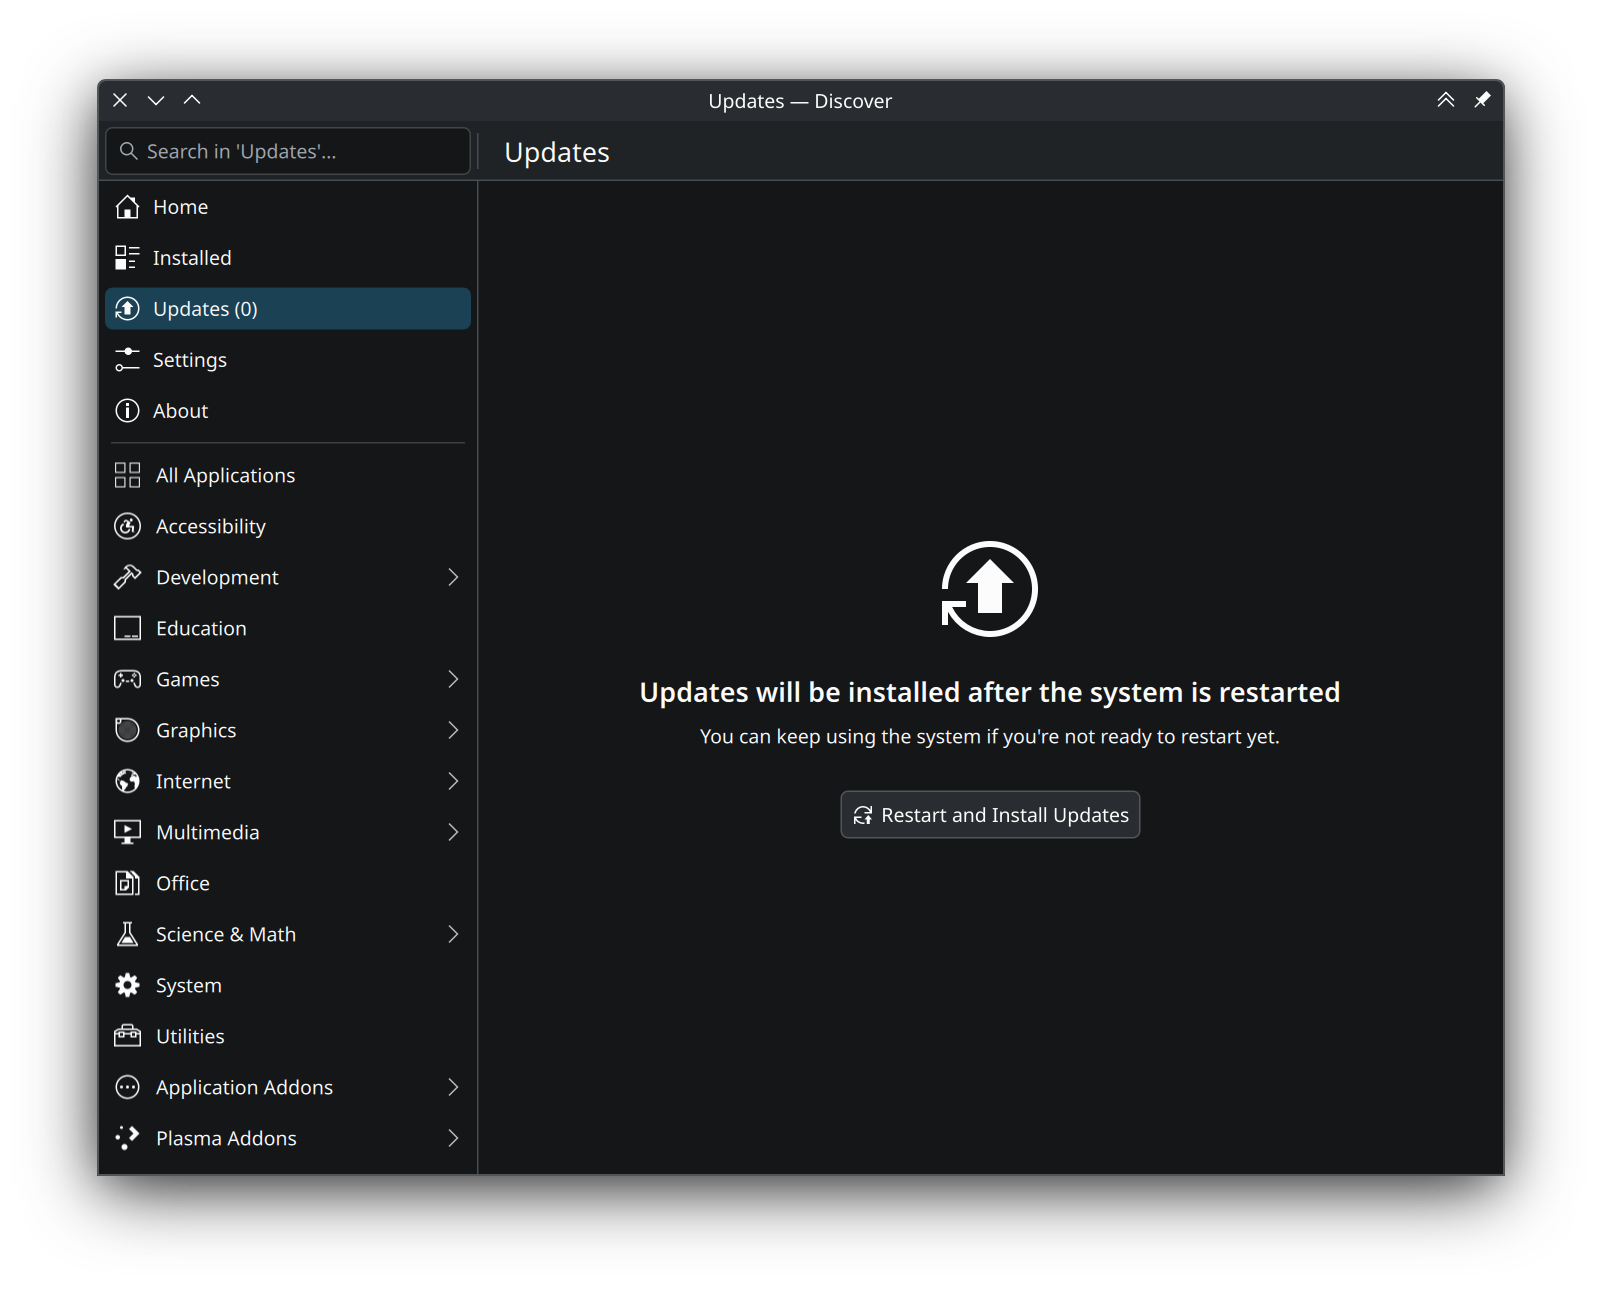
If you see such a screen, click the Restart and Install updates button.
11.3 Install Proprietary Media Codecs
Fedora is free and open-source software. The Fedora team only puts packages that are free and open-source in their “repositories”. Repositories (or repos) are servers where you can download packages from. Fedora has a default repo maintained by the Fedora team that has lots of useful packages, but if you want to install a proprietary closed-source application like Discord, Steam, etc., you’ll have to add another repository, or alternatively use Flatpaks (covered later).
Unfortunately, most of the videos we watch are encoded with the HEVC codec, which is not open-source software. Thus, Fedora does not include it in its default repos.
There is a third-party (as in repos not made or endorsed by the Fedora team) repository called RPMFusion that packages, according to them, “software that the Fedora Project […] doesn’t want to ship”, which includes proprietary media codecs.
We want you to visit their website at https://rpmfusion.org and follow the
instructions to “Enable RPM Fusion on your system”. You can use the
Graphical Setup method which downloads an rpm file that can
be opened using Discover and enabled. Please download the
correct RPM file for your Fedora version, 44 in
case of this guide. Do this for both the free and
nonfree repositories.
We’re not providing specific instructions here to let you learn how to read the documentation and follow instructions from other websites.
Next, after RPM fusion is enabled, install the proprietary media
codecs by following the instructions on this page:
https://rpmfusion.org/Howto/Multimedia
You have to install ffmpeg and hardware-accelerated
drivers for your system (Intel, AMD, or NVIDIA).
Additionally, if you have an NVIDIA graphics card, please give this
page a read:
https://rpmfusion.org/Howto/NVIDIA
11.4 Change Plasma settings
The Plasma Desktop Environment is one of the most customisable DEs on Linux. Open the “System Settings” application and look around to find options that may interest you
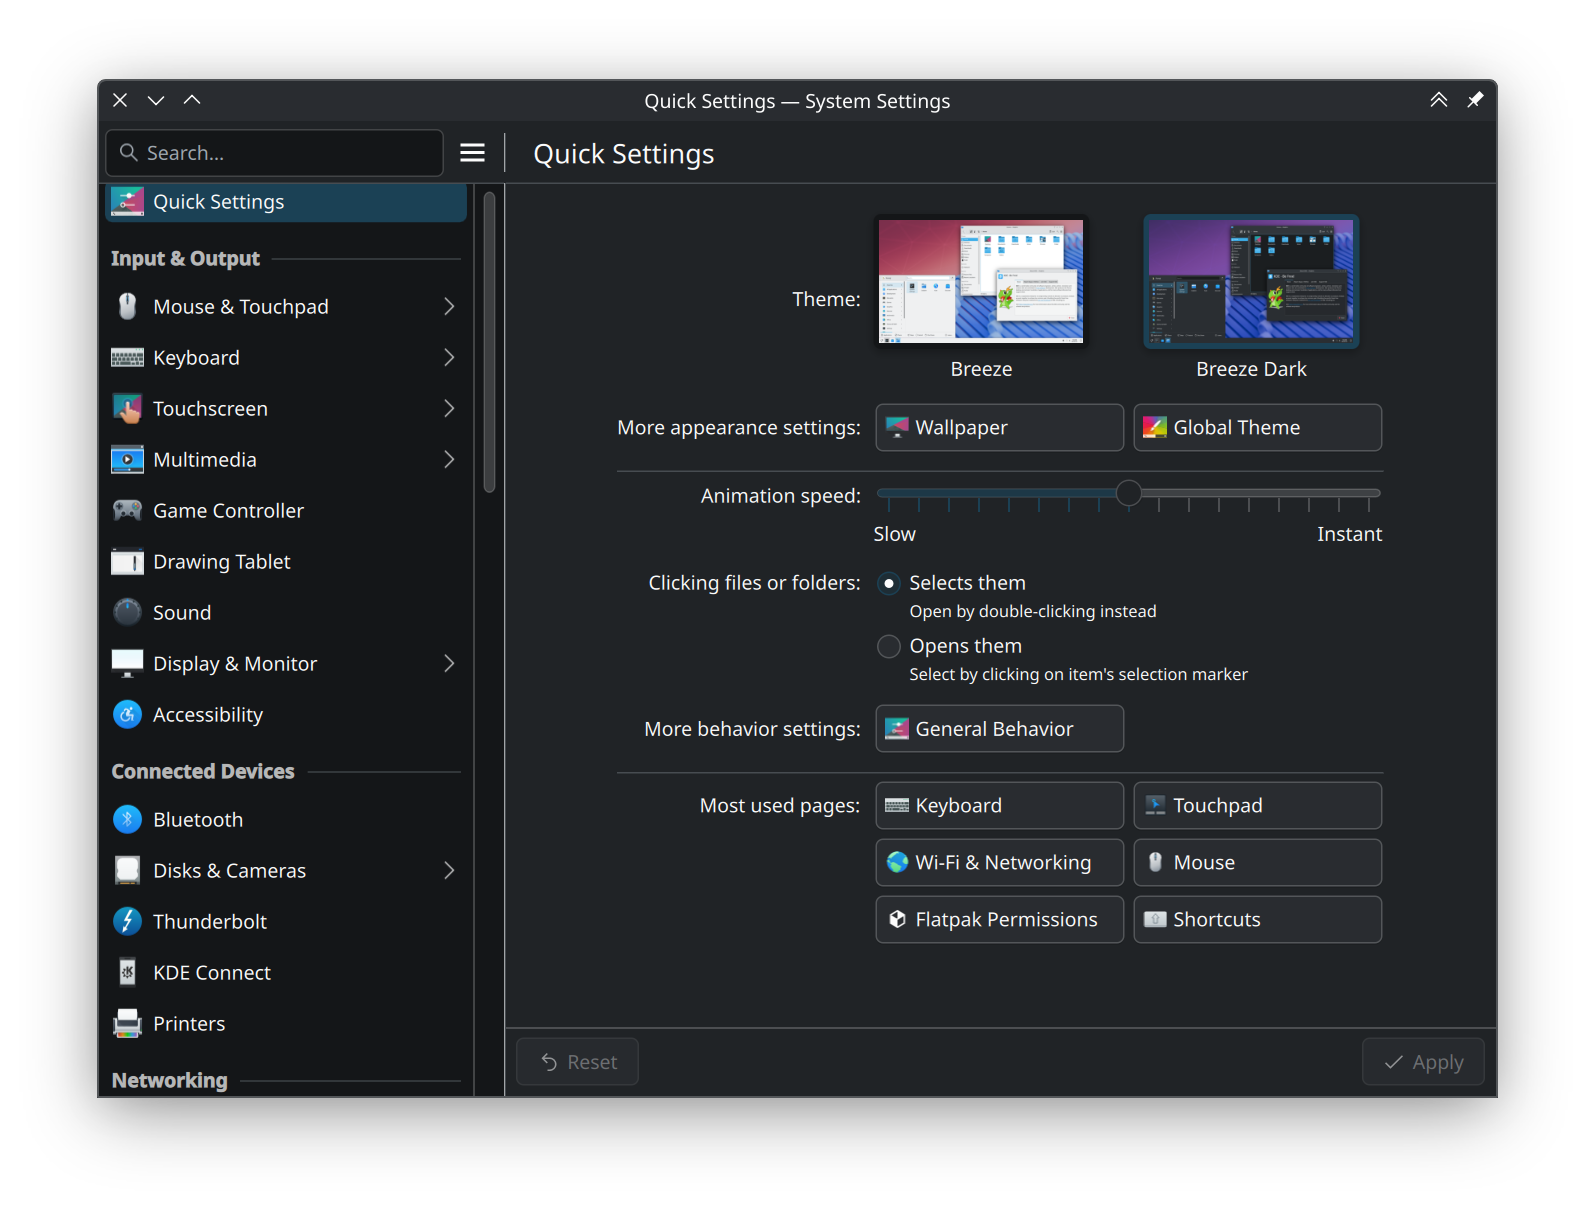
A few recommended categories of settings to check out:
Mouse & Touchpad, Keyboard, Sound, the Appearance & Style
section, etc.
Enjoy your new desktop that YOU can own and customize!
11.5 Install Applications
On Windows, you’re used to going to app websites and downloading an
“exe” file. On Fedora (and other Linux distros), applications are
“packaged” for installation by the distro team and made available to you
through a package installer tool like dnf or
flatpak. You could also install applications from the web
by downloading “rpm” files and opening them using Discover, but this
method must be used as a last resort.
The Discover application makes installing applications easy! It is a GUI app store that uses these package installers to install apps while giving you a friendly UI to do so. Open Discover, search for the application you want, or browse applications using the categories in the left sidebar, and click the “Install” button to install the application.
For example, here I search for Steam and I’ve installed the “Flatpak” version.
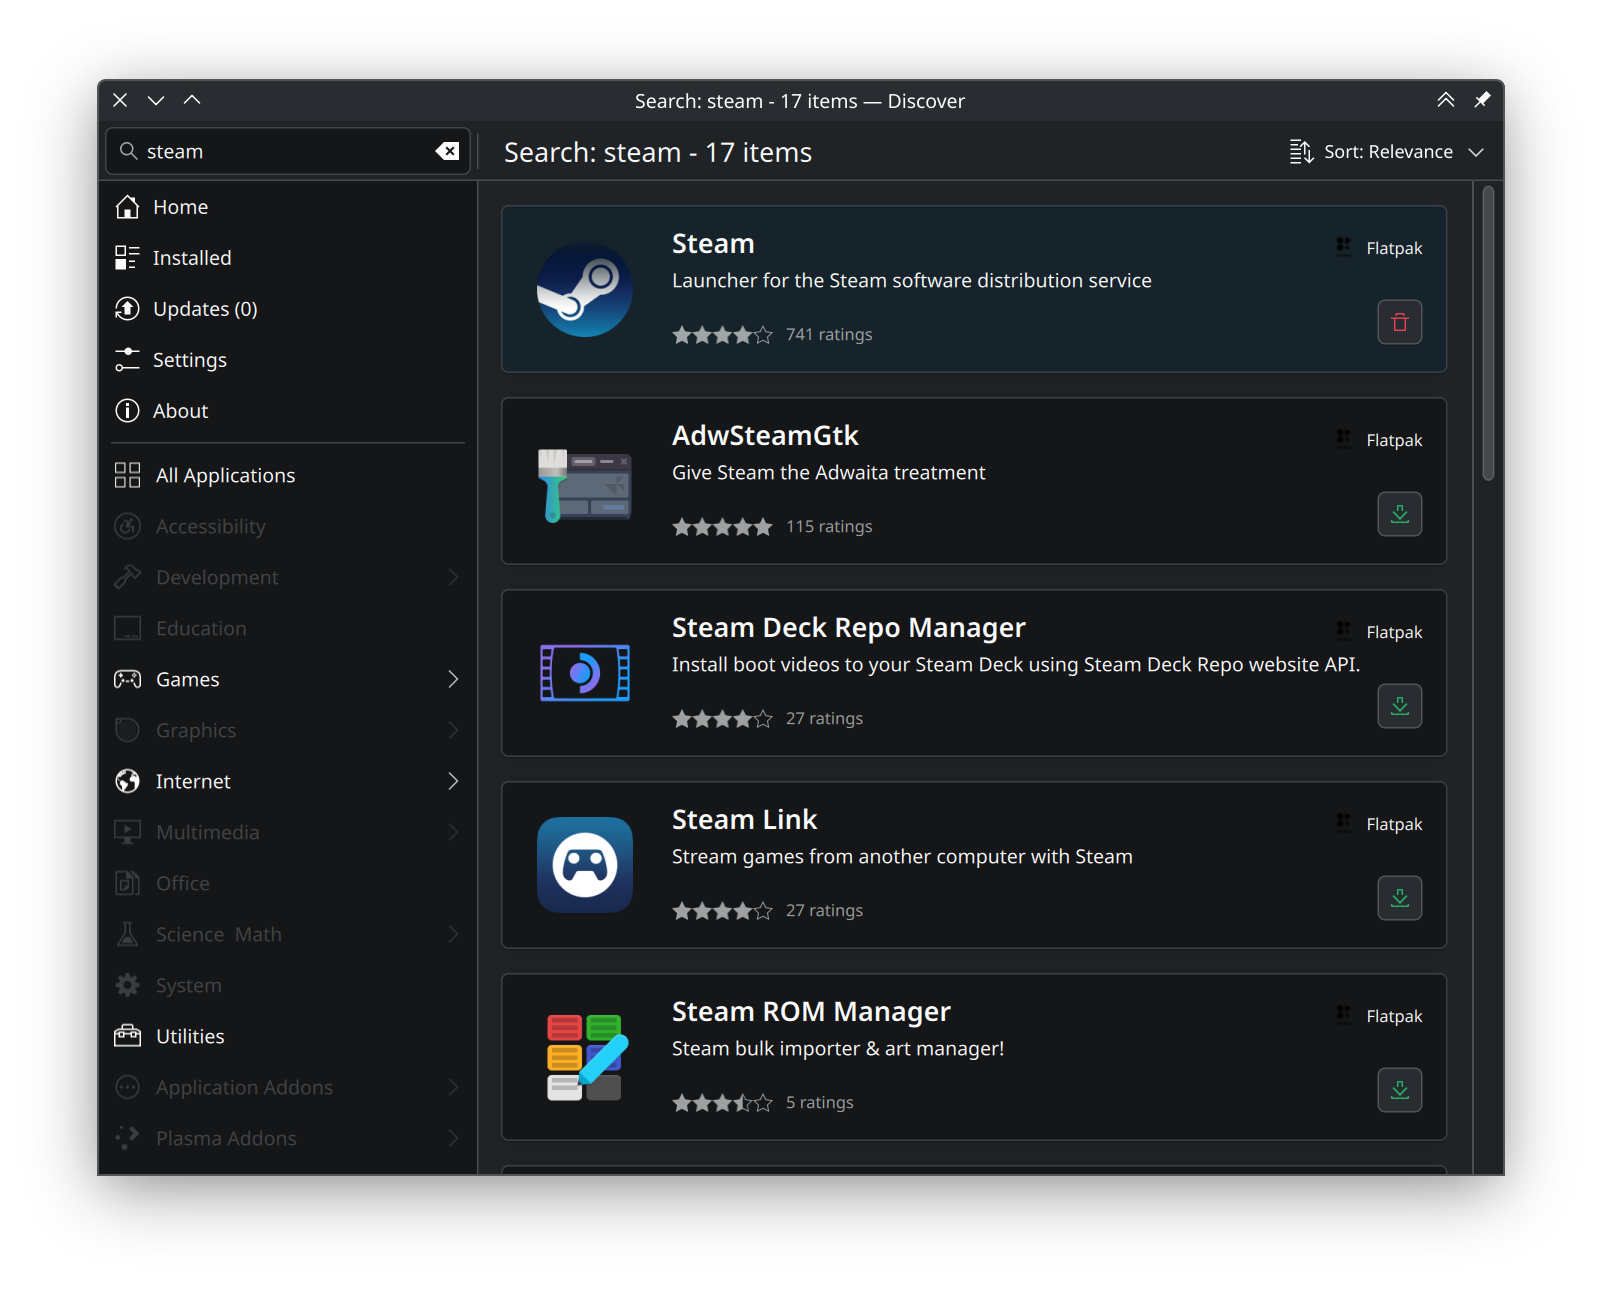
Flatpak is another packaging format, like the default RPM you saw earlier. Flatpak is meant for graphical apps (like Firefox, Steam, and other GUI apps). It runs them in a sandbox environment which prevents installed applications from modifying files willy-nilly.
Flatpak should be the preferred method of installing applications, unless the sandboxing nature interferes with the application’s functioning. For example, VS Code is an application that doesn’t work that well with Flatpak.
For other packages, stuff like the Python programming language, the
GCC C compiler, a new Kernel, or basically anything that isn’t a GUI
application, the RPM format should be used. You can install these apps
using the dnf command line tool or through Discover.
Here are some useful dnf commands:
Install a package |
|
Search for packages |
|
Get package info |
|
Remove a package |
|
Upgrade a package |
|
To install VS Code, you should download the “RPM” file from the VS Code website.
11.6 Browse files from Windows
Open the “Dolphin” file manager. In the left sidebar, you should see your Windows drive in the “Devices” section. Click on it to mount it, you may have to enter your password.
You can now browse your Windows files! Make sure to eject your drive (by pressing the little eject icon button next to the drive name) once you’re done browsing!